Working w/ XIBs & Storyboards
When and how do XIB files (or storyboards) get loaded? There are several possibilities:
NSMainNibFile
If your Info.plist contains an NSMainNibFile entry, the Cocoa runtime will automatically load up that NIB as your application starts up. The global NSApplication/UIApplication instance will become the File's Owner of the NIB, and every object in your NIB will be instantiated.
Similarly, if Info.plist contains a UIMainStoryboardFile entry (on iOS), the system will load the NIB for the view that was marked as entry view in the storyboard, in the same fashion.
This mode is common for most Mac and iOS applications, and in fact you can see it in action in our Cocoa Application template(s). You probably noticed that (aside from the startup code in the Program) the project contains an AppDelegate class that is usually used as the "launching point" for your application's own code.
How does this AppDelegate class get instantiated? Easy: If you open the MainMenu.xib file in Xcode (the XIB that is specified to be the NSMainNibFile in Info.plist from the template apps), you see that – among other pieces – it contains an AppDelegate item. This is your own AppDelegate class.
initWithNib:*
For simple applications, you can get away with just putting all your stuff into MainMenu.xib, but as applications get more complex, that's a bad idea, not only because – as indicated above – when an XIB is loaded, all objects referenced in it are created. If your application contains dozens of windows or views, you don't usually want all of those to be loaded up as your application starts.
Instead, it is common practice to pair individual XIBs for each view or window XIB with a matching ViewController or WindowController class – a practice that you will see in just about all the iOS project templates, and also in the *Controller item templates we provide with Elements.
How does this work?
Simple: Your application will define a custom class, usually descended from UIViewController (or NSViewController/NSWindowController) where you will put all the application logic for that view or window. As far as your app is concerned, this class is your implementation for that particular view (or window – for simplicity reasons we'll stick to talking about iOS views for now, but the same concepts apply for OS X views and windows).
In the initializer for your view controller, you will ask the base class to load up the XIB file that backs your view, for example by calling:
self := inherited initWithNib('MyViewController') bundle(nil);
this = base.initWithNib("MyViewController") bundle(null);
super.init(nib: "MyViewController", bundle: nil);
this = super.initWithNib("MyViewController") bundle(null);
This essentially tells the base class to initialize it by loading MyViewController.xib (from the main application bundle) and creating all the objects defined in it.
So all those objects get loaded up, but how do you then get access to them from your code? Simple: Remember when I said above that the object loading the XIB becomes the File's Owner? When you load an XIB using the initWithNib() call, your view controller class becomes the File's Owner and any connections you set up in the XIB between the File's Owner and the other elements in your XIB will be connected to your view controller class.
Connections
Did we say connections? So how does this work?
Easy, really. XIB files know about two basic kinds of connections between objects: Outlets and Actions.
You can think of outlets as references to other objects. If your view controller class has a property of type UIButton, and your XIB file contains a UIButton, that's a match made in heaven. You can just Ctrl-drag the button onto the File's Owner (or vice versa) in the XIB to hook them up, and now you have access to the UIButton from your code, because as the XIB gets loaded and the UIButton gets created, it gets hooked up to your property automatically.
Actions, you may have guessed, can be thought of as events. If something happens with the objects in the XIB (such as a button being tapped), they send out events. Just as above, if your view controller exposes a method with the right signature (that is, any method with exactly one parameter of type "id" or a concrete class), you can Ctrl-drag it into your XIB file to hook them up, and when the event triggers, that method is called.
Of course outlets and actions can be hooked up between any two objects inside your XIB, not just with the view controller. For example, you can cause an action on one control to trigger a method on a different control.
Ok, so how does the XIB designer in Xcode know about the methods and properties on your view controller (or other classes)? Magic! As you write your classes, Elements will automatically* update the XIB and Storyboard files behind the scenes, with information about all the relevant classes and their properties and methods – i.e. any property marked "[IBOutlet]" and any method marked "[IBAction]". As you work on your XIB file in Xcode, it sees this information and makes the connections available.
If you need to expose a new control to your code or want to hook up a new event, simply add a new property or method to your code, and that's it.
Let's See This in Action
For this example, let's create a new "UIViewController with XIB" from the template and then add the following items to the "MyViewController" class:
[IBOutlet] property myButton: UIButton;
[IBOutlet] property myLabel: UILabel;
[IBAction] method buttonTapped(aSender: id);
[IBOutlet] public UIButton myButton { get; set; }
[IBOutlet] public UILabel myLabel { get; set; }
[IBAction] public void buttonTapped(id sender) {  }
@IBOutlet var myButton: UIButton?
@IBOutlet var myLabel: UILabel?
@IBAction func buttonTapped(sender: Any?) {  }
@IBOutlet UIButton myButton { __get; __set; }
@IBOutlet UILabel myLabel { __get; __set; }
@IBAction public void buttonTapped(id sender) {  }
The following screenshots explore the XIB (and Storyboard) designer in Xcode:
Figure 1: On the left side of the window, you see a hierarchical view of all the objects in the XIB – this includes all visual objects (in this case just the one UIView for now, but also other objects such as the File's Owner).
On the right side, the "Utilities View" has the "Identity Inspector" pane activated, showing details about the selected object (the File's Owner). Note that the XIB designer knows that File's Owner is a "MyViewController". It got that information from the template – but this is editable, so you can just type in or select the right class name. Of course it should match the class that is loading this XIB at runtime.
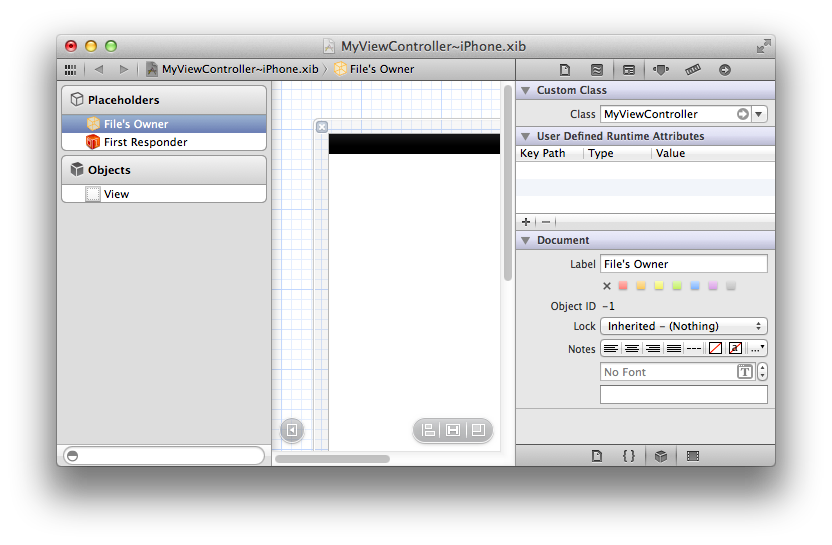
Figure 2: We have dropped a couple of controls onto the view – you can see them both visually and in the hierarchy on the left. The right pane has been switched over to the "Connections Inspector" tab, which shows all the connections available on our File's Owner. Among them, you see our two properties and the method. There's also a "view" property (defined by the UIViewController base class), already connected to the root view.
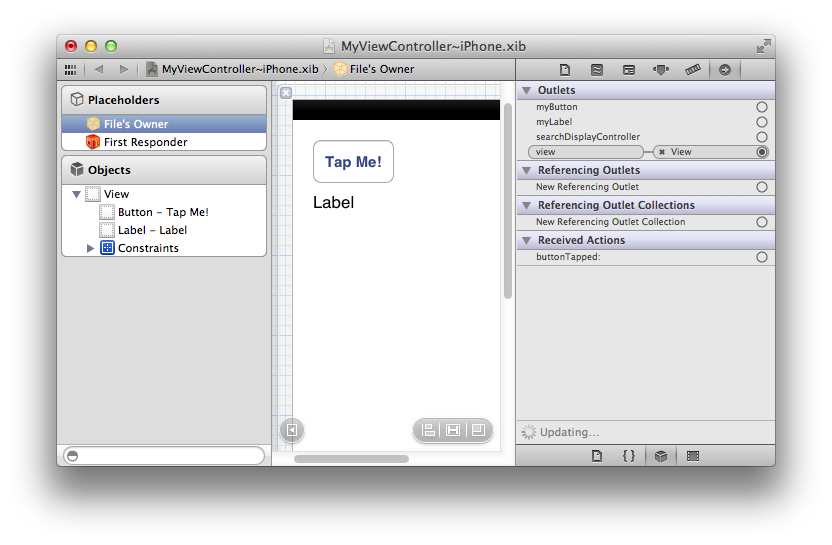
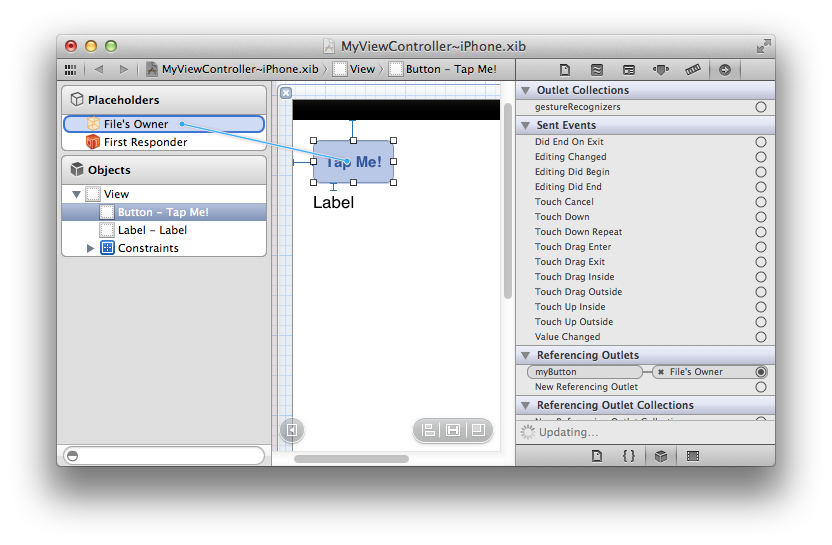
Figure 3: Click and drag from the little circle right of the "myButton" name to the button to make a connection to the UIButton. (You can drag to the control on the design surface or to the "Button – Tap Me!" item in the hierarchy.)
Let go when you are over the button, and the connection is made. If you were to go and build your app now, the myButton property would give you access to the button from code.
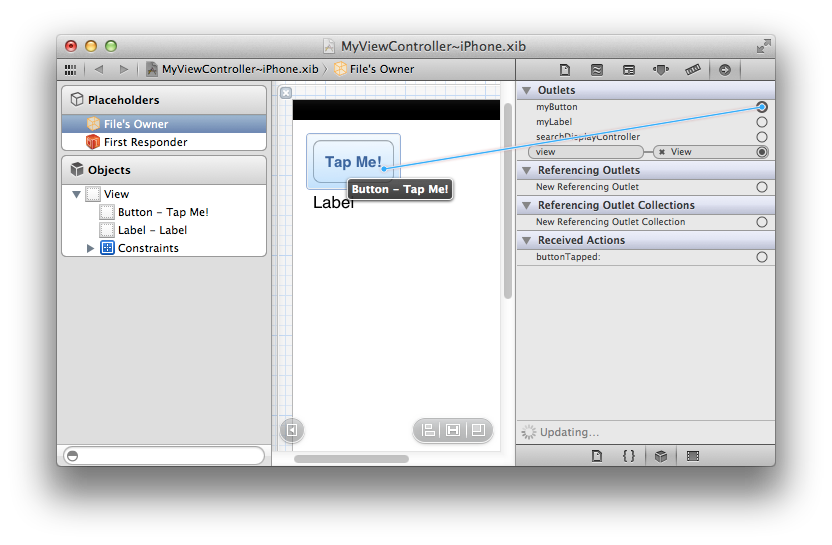
Figure 4: You can also drag from the hierarchy view to a control. When you let go, the XIB designer will present a list of all properties that match – in this case the UILabel qualifies both for "myLabel", and for the "view" property (because UILabel descends from UIView).
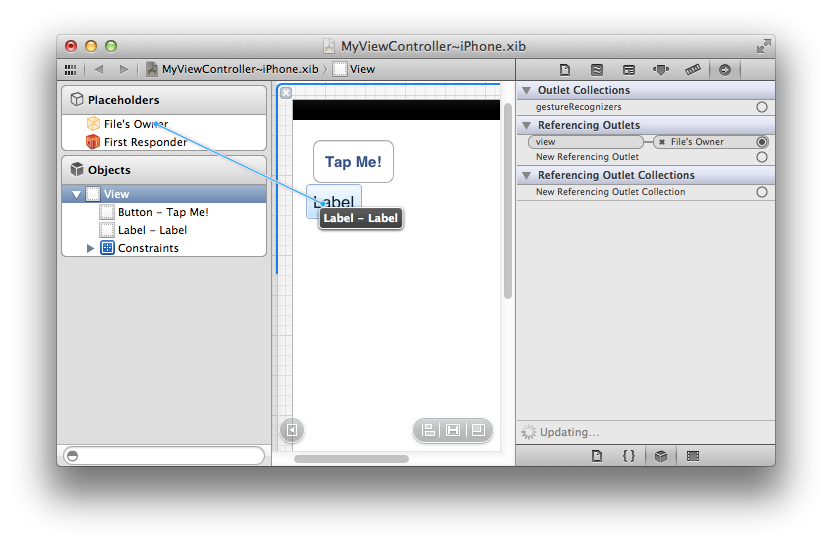
Figure 5: Connection actions work the same way. You can Ctrl-drag from the control to the receiver (here the File's Owner) to connect the default action of that control (in this case, the button tap) to a method. As you can see, the Connections Inspector also shows a complete list of all actions that can originate from the control, so you can, if needed, assign them all to individual methods.
Now all that's left to do is maybe write an implementation for "buttonTapped" such as this:
[IBAction]
method MyViewController.buttonTapped(aSender: id);
begin
  myLabel.text := myButton.titleLabel.text;
end;
[IBAction]
public void buttonTapped(id sender)
{
  myLabel.text = myButton.titleLabel.text;
}
@IBAction
public func buttonTapped(sender: Any?) {
  myLabel.text = myButton.titleLabel.text
}
@IBAction
public void buttonTapped(id sender)
{
  myLabel.text = myButton.titleLabel.text;
}
to see both actions and outlet access in – pun not intended – action.
What's "First Responder"?
Similar to File's Owner, "First Responder" is another placeholder object exposed in the XIB file that has special meaning. The First Responder is not a concrete object, but essentially refers to "the first object that has focus that can handle this".
By connecting actions to the First Responder, you can have them dynamically be sent to different parts of your application, depending on the state your app is in. A good example is the "Edit|Copy" menu in a Mac application. If a text field has focus, you would expect the Copy command to apply to the content of that text field. If a different control has focus, different content would be copied. By connecting the menu's action to the First Responder's "copy:" method, Cocoa will take care of calling "copy()" on whatever control or view has focus – in fact, all you need to do to make Copy/Paste work with your own custom view is to implement the corresponding methods, and they will get called if your view has focus as the user invokes the menu item (or Cmd-C keyboard shortcut).
Summary
This article gave you a quick introduction to XIB files and how they work. A good 95% of the content of this article is not really specific to Elements; the same concepts and techniques apply to working on XIB files with Objective-C or Swift in Xcode – that's by design, because Elements is a true first class citizen on the Cocoa frameworks and Objective-C runtime.