Your First .NET Command Line App with Elements
Elements integrates with the Visual Studio project template system to provide you with skeleton projects to get started with a new app.
This tutorial will cover all languages. For code snippets, and for any screenshots that are language-specific, you can choose which language to see in the top right corner. Your choice will persist throughout the article and the website, though you can of course switch back and forth at any time.
To start with a new project, simply select "File|New|Project..." from the main menu, or press ^⇧N. If you have the Start Page showing, you can also select "New Project..." near the top left corner.
This will bring up the New Project dialog. Depending on what edition(s) of Elements you have installed, you will have templates for one or all Elements languages: Oxygene, C#, Swift, Java, Go and Mercury. Depending on your edition of Visual Studio, it might also offer templates for other, Microsoft-provided languages:

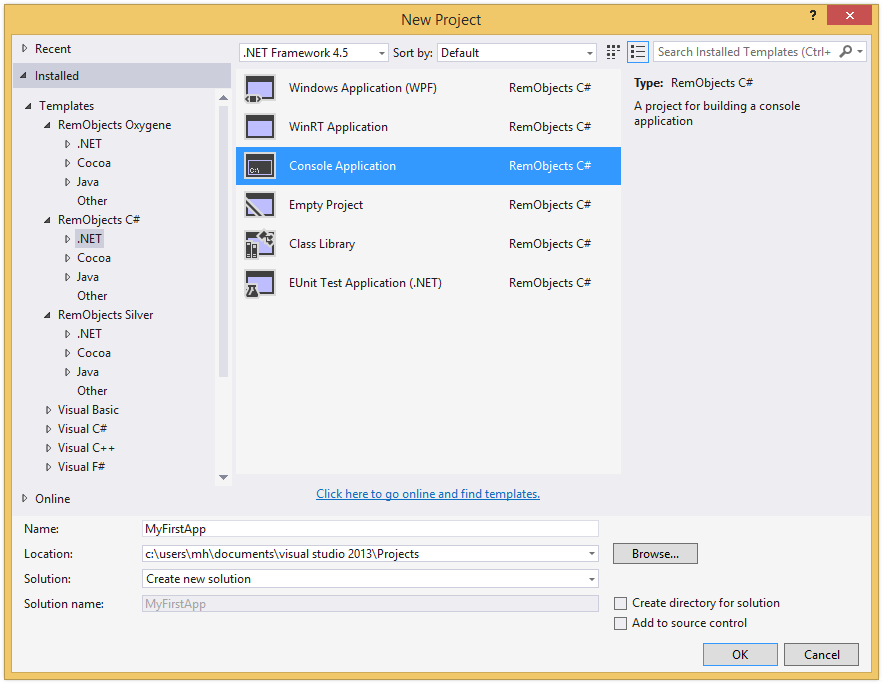
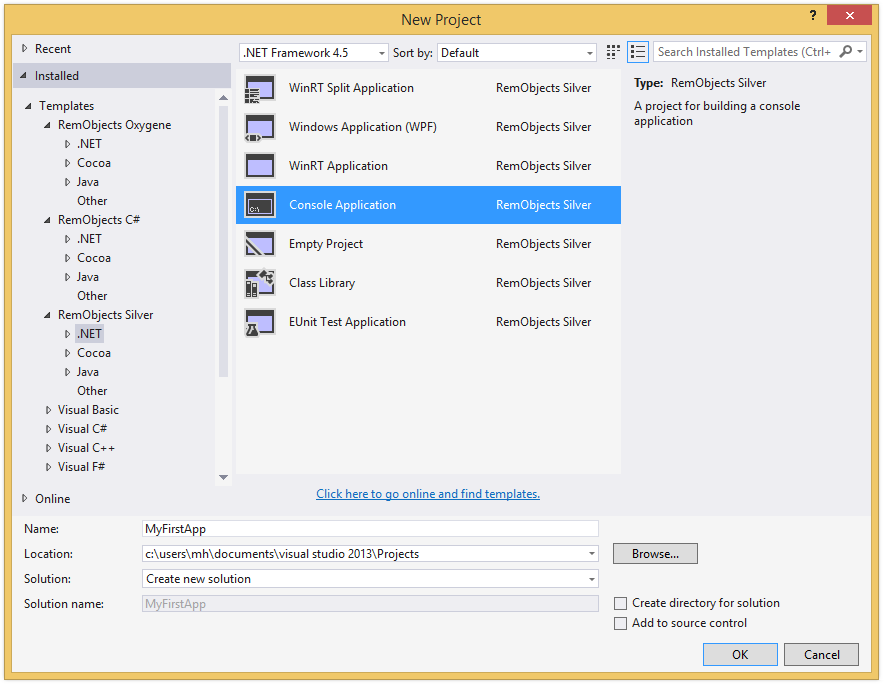
Select your language of choice, and then find the "Console Application" icon below. (Elements allows you to create console apps using all platforms, but this tutorial covers the .NET version only.)
On the next step you can choose a name for your application, as well as a location on disk where you want to store it. For this tutorial, name the project "MyFirstApp" and then click "Create".
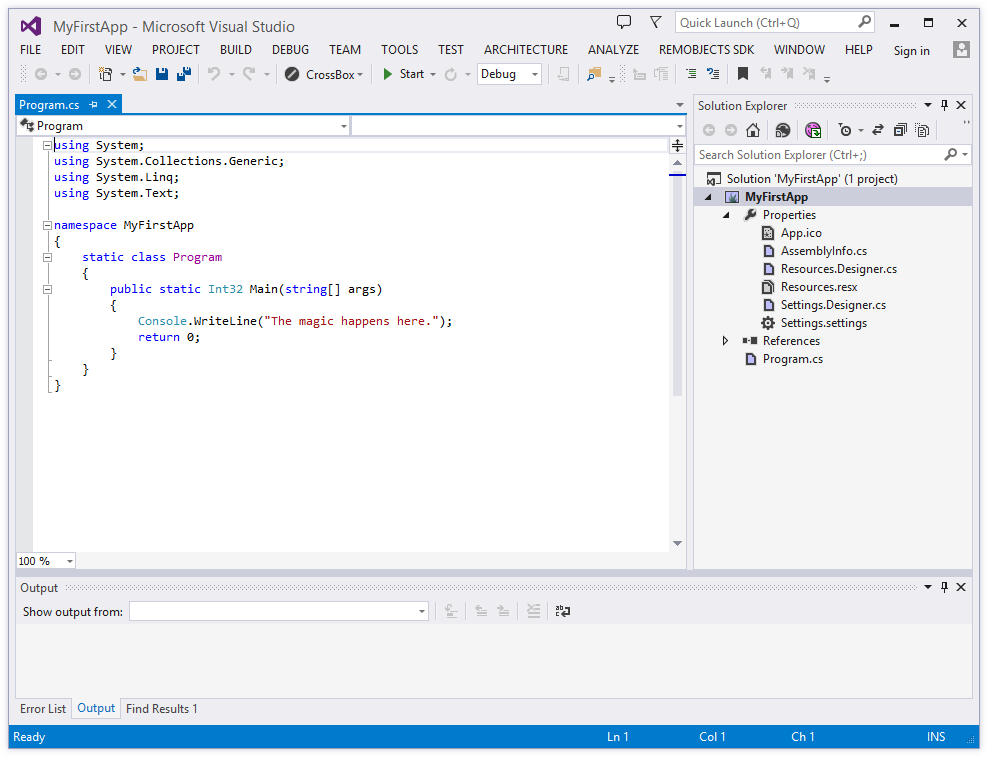
Your project will be created and open in the IDE within a few seconds. Visual Studio should now look something like this:
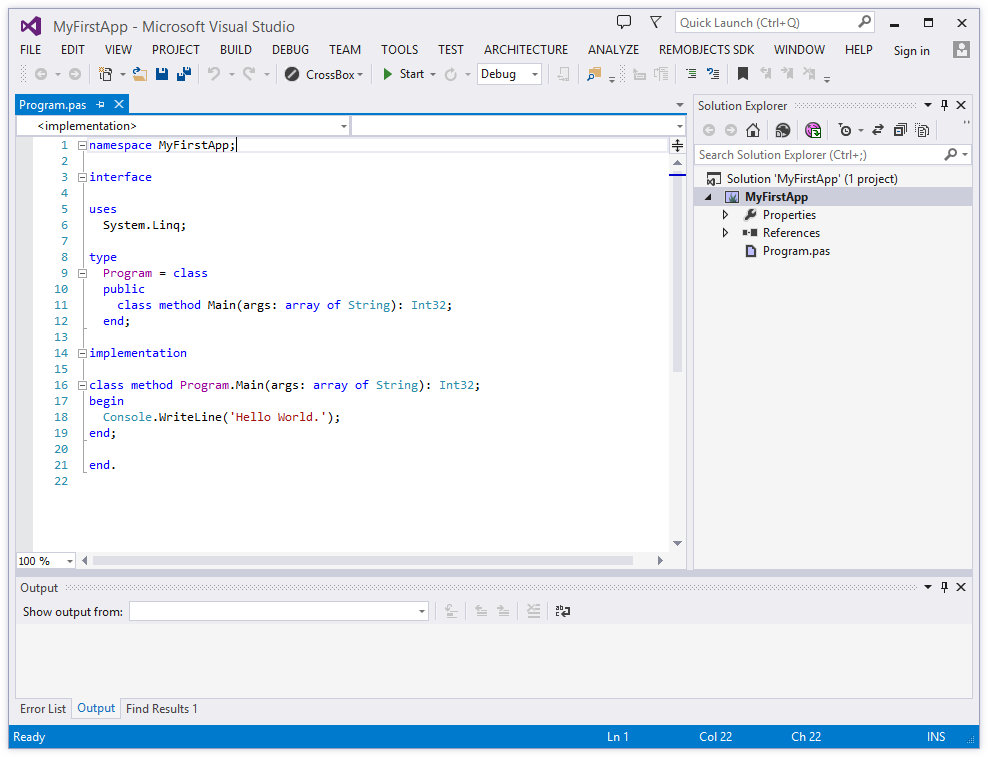
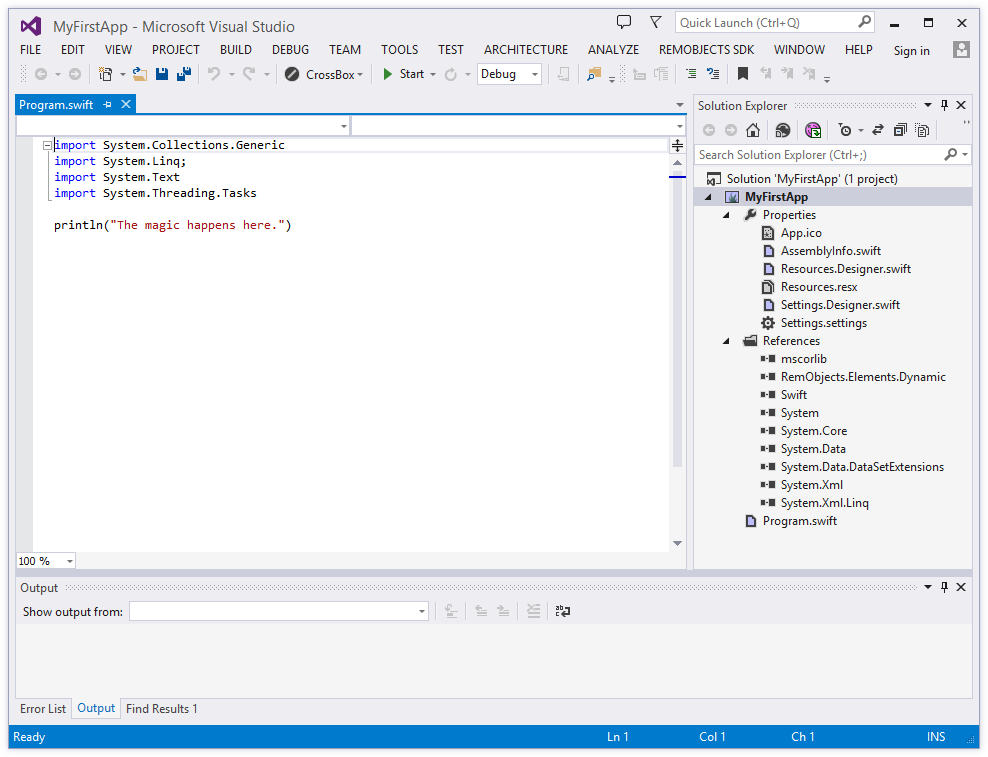
Let's have a look around this window, as there are a lot of things to see, and this is the main view of Visual Studio where you will do most of your work.
The Visual Studio Main Window
On the right side, you see the Solution Explorer. The Solution Explorer is one of several panes that can be docked to this side, and it will show you a hierarchical view of your project.
Elements works with projects inside of a Solution (hence the name). You can think of a Solution as a container for one or more related projects. Visual Studio will always open a solution, not a project – even if that solution might only contain a single project, like in this case.
You can close Solution Explorer to get it out of the way (for example on small screens), and you can always bring it back via the "View|Solution Explorer" main menu item.
The Solution/Project Tree
The Project Tree shows you a full view of everything in your project (or projects). Underneath the root node for the solution, each project starts with the project node itself, with the square Elements Project logo as icon. The icon is color-coded by platform (blue for .NET, green for Cocoa and yellow for Java), as will be the source code files.
Each project has two special nodes, along with any additional files in the project.
-
References lists all the external frameworks and libraries your project uses. As you can see in the screenshot, the project already references all the most crucial libraries by default (we'll have a look at these later), and you can always add more by right-clicking the References node and choosing "Add Reference..." from the context menu. Please refer to the References topic for more in-depth coverage.
-
Properties is a regular folder that can (and does) contain files, but it also gives you access to all the project settings and options for the project, which pen in a new tab when you double-click the node. The project settings are covered in great detail here.
-
In addition, your project will contain one or more (usually more) other files, both source code and other types, that make up your application. These files may be on the top level next to References and Properties, or nested in additional subfolders.
The Main View
The bulk of the Visual Studio window is filled with the file(s) you work in, showing in different tabs across the top. As you select files in Solution Explorer, they will show as a temporary tab on the right. You can double-click files in Solution Explorer to open them in tabs that stick around longer, and show on the left, as in the screenshot above.
You can navigate between files both via any open tabs at the top, or by Solution Explorer.
Your First .NET Project
Let's have a look at what's in the project that was generated for you from the template. This is already a fully working app that you could build and launch now – it wouldn't do much, but all the basic code and infrastructure is there.
There are two parts that are interesting. First, there's the Program source file. This file servers as your program entry point, and has the so-called main() function where execution starts. Secondly, there's a Properties folder with a whole bunch of files that provide additional details and configuration for your project. The files in here will be common for all .NET projects.
The Properties Folder
If you want to start coding right away, you can, for now, pretty much ignore the files that are in here and skip to the next section. But in the interest of making you familiar with how .NET projects work, let's have a brief look.
Essentially, there are four main files in this folder, two of which have a nested .Designer code file associated with them.
-
App.ico, simple enough, is the icon for your executable, in standard Windows Icon format. Different than Mac apps, in .NET even command line executables can have an icon (although you will never see it anywhere, except on Windows), as the icon gets embedded directly into the executable file. The name of this file is not magic or hardcoded – it is referenced from the Project Settings. -
AssemblyInfo.*is a code file that contains some standard Attributes that define metadata for your executable. These attributes can, for example, set a description and copyright message, or give the.exea Strong Name via code signing. There's typically no code in this file that will run (although nothing keeps you from adding some, or from moving the attributes out to a different code file). -
Resources.resxis a .NET resource file in XML format that can be used to add resources such as images or strings to the project in a way that can make them easily localizable, and easily accessible from code. The file has a nestedResources.Designer.*code file that will get updated automatically as the.resxchanges, and provides direct access to the resources from code, via a class calledMyFirstApp.Properties.Resources. -
Settings.settingsis another XML file, this one allowing you to define configurable settings for your project. Imagine your app needed the URL of a server to talk to. You cold define a setting for that URL here, along with a default, and read that from code. Users of your app could later override the URL by providing a.configfile next to your executable where they provide a different value. Like the.resx, this file has a nestedSettings.Designer.*code file that will get updated automatically as the.settingschanges, and provides direct access to the resources from code, via a class calledMyFirstApp.Properties.Settings.
For the purpose of this tutorial, you can ignore all of these files and move on to the code in Program.
Program and the main() Entry Point
The Program source file is where the execution of your app starts and where (currently all) of the app's code lives. As mentioned before, the entry point is sometimes also referred to as the main() function. Let's have a look.
In Oxygene and C#, the entry point is provided quite literally by a static method called Main() that matches a well-defined signature: It takes an Array of Strings as parameter and optionally returns an Int32.
The string array will contain any parameters passed to the program from the command line, or will be empty if the program is called without (note that on .NET, the parameters do not include the executable name as first parameter, unlike native Mac console apps).
In Swift, the entry point looks a bit different. Any one single file in a Swift project can just contain code that's not contained in any class, and that code will be treated as the entry point. So Program.swift defines no explicit class or main() method, and instead just a line of code. If needed, the command line parameters can be accessed via the global C_ARGV variable, which is a [String] array, and their count can be accessed via C_ARGC.
class method Program.Main(args: array of String): Int32;
begin
 writeLn('The magic happens here.');
end;
public static Int32 Main(string[] args)
{
    Console.WriteLine("The magic happens here.");
    return 0;
}
println("The magic happens here.")
As you can see, the default implementation of the entry point does one thing: print out The magic happens here. to the console.
The templates for the five languages use a different method for this, but this is purely a matter of taste or preference:
The C# snippet uses Console.WriteLine, which is the official .NET API for talking to the console. The static Console class has many functions that allow your code to interact with the terminal, including Console.ReadLine to read input, as well.
The Oxygene template uses writeLn(), which is a System Function, and the "classic" way for Pascal to print to the console. writeLn() (and its counterpart write()) are available to all languages and on all platforms, so using writeLn() instead of Console.WriteLine is a good way to write code that can cross-compile to Java or a native mac console app, too.
The Swift code uses println() which is a standard Swift API, defined in the Swift Base Library. Like writeLn() it works on all platforms, but is only available in Swift (or any project that uses the Swift Base Library).
The templates here differ merely to reflect the default that developers of each language would expect.
Without any further ado, you should now be ready to run this (very simple) first command line app.
Running Your App
To run your app, just hit the "Start" button with the Play icon or press F5.
Visual Studio will now build your project and launch it. Since it is a console application, no UI will show up. In fact, it might seem as if nothing much happens at all, and that's because your application currently just prints a line of text, but then quits immediately. And the way Windows handles console applications, they launch in their own console window, which closes right away after the app is done.
To fix this, go and expand the code in Program by one line:
Console.ReadLine();
Console.ReadLine();
Console.ReadLine()
This will make your app ask for user input – any input followed by the return key – before it quits.
Hit F5 again, and now your app will show and wait for the user to react to it:
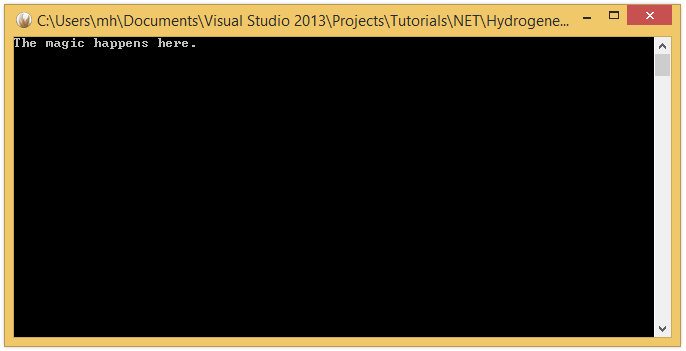
Press Enter, and it will terminate.
Running .NET Console Apps Cross-Platform
Via Mono, you will be able to take this same executable you built on Windows and run it on Mac OS X and Linux systems, as well. This is great for writing cross-platform command line tools or servers.
Of course Elements also lets you write Mac-native and Java Console apps as well, which are covered in separate tutorials here.