Your First tvOS App with Elements in Visual Studio
Elements integrates with the Visual Studio project template system to provide you with skeleton projects to get started with a new app.
This tutorial will cover all languages. For code snippets, and for any screenshots that are language-specific, you can choose which language to see in the top right corner. Your choice will persist throughout the article and the website, though you can of course switch back and forth at any time.
To start with a new project, simply select "File|New|Project..." from the main menu, or press ^⇧N. If you have the Start Page showing, you can also select "New Project..." near the top left corner.
This will bring up the New Project dialog. Depending on what edition(s) of Elements you have installed, you will have templates for one or all Elements languages: Oxygene, C#, Swift, Java, Go and Mercury. Depending on your edition of Visual Studio, it might also offer templates for other, Microsoft-provided languages:
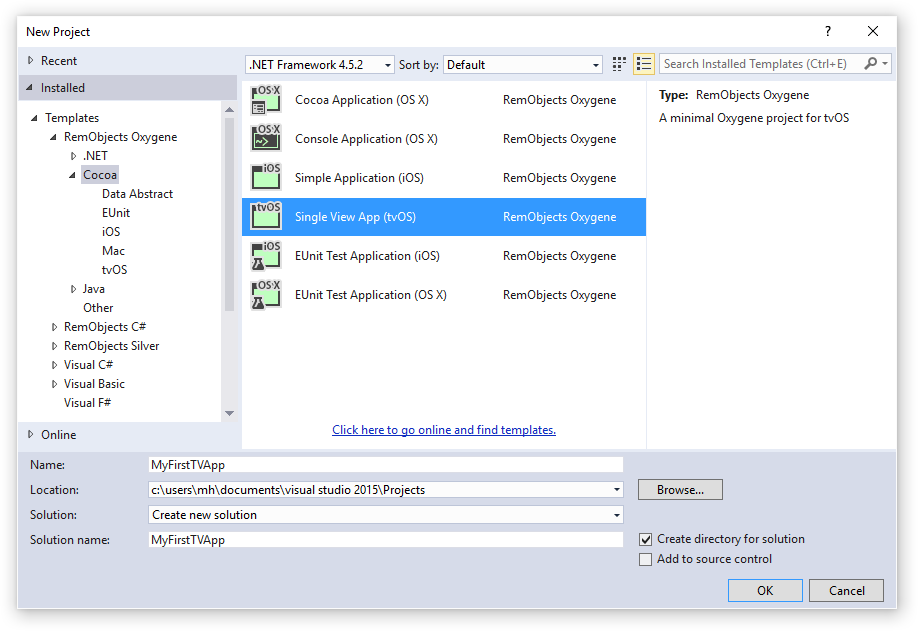
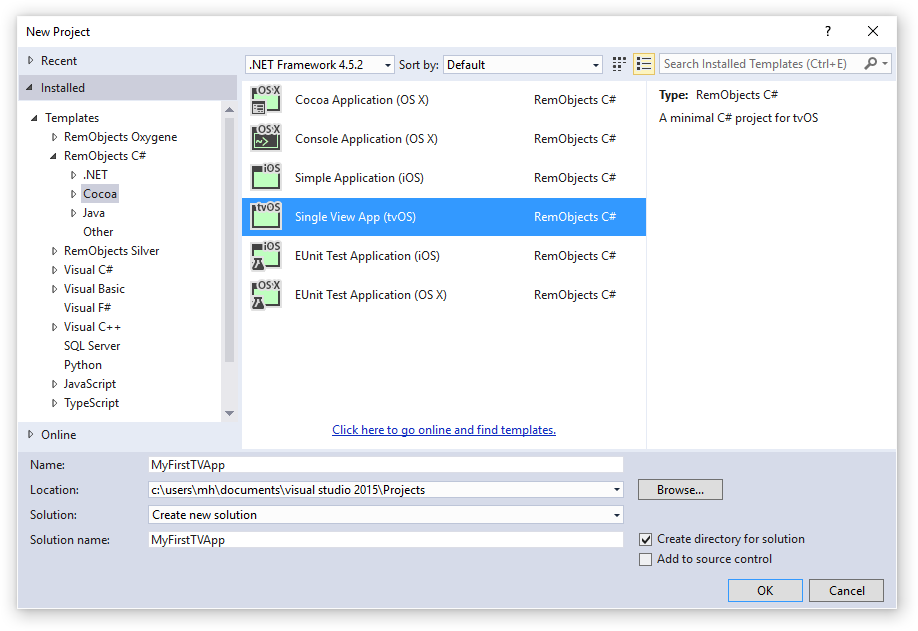
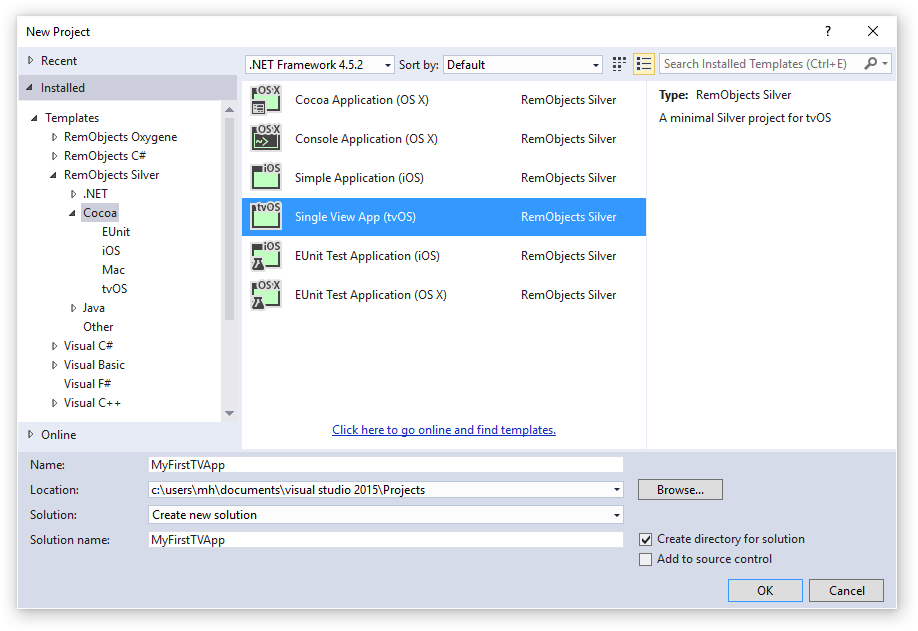
Select your language of choice, and then find the "Single View App (tvOS)" icon underneath the "Cocoa" folder.
At the bottom of the dialog, you can choose a name for your application, as well as a location on disk where you want to store it. For this tutorial, name the project "MyFirstApp" and then click "OK.
Like for all Cocoa projects, Visual Studio will need to connect to a Mac running CrossBox and Xcode to perform certain build tasks and to run your apps (on Simulator or device). So Elements will ask you which Mac to connect to and which device to use, with the following dialog:
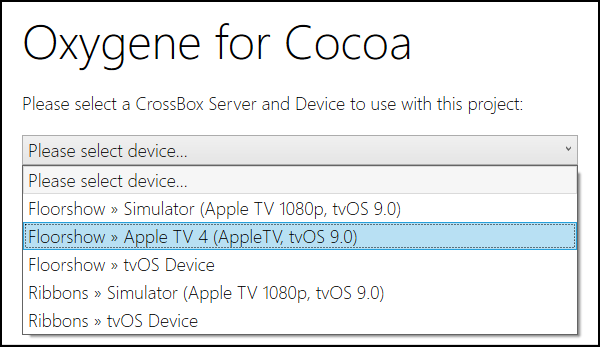
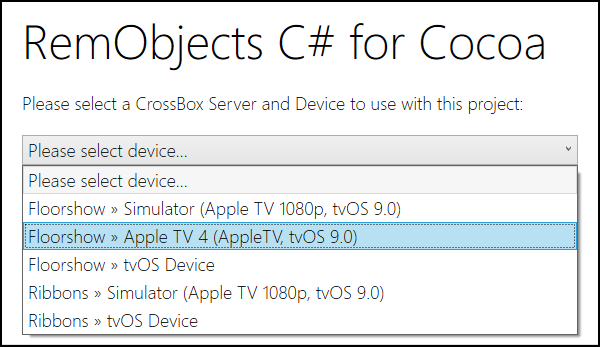
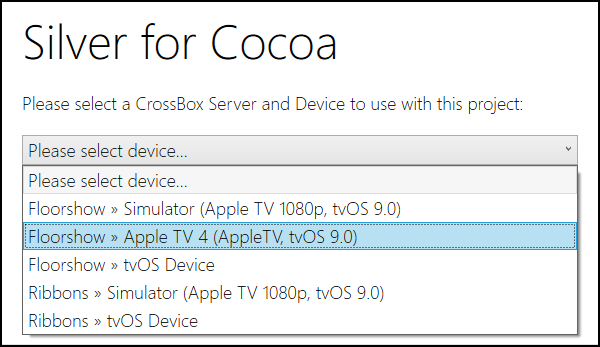
If you already have CrossBox set up, just pick an appropriate device (for example the tvOS Simulator); if not, you can read more in this topic about setting up CrossBox and your Mac to use with Elements in Visual Studio.
Click "OK", and your project will be created and open in the IDE within a few seconds. Visual Studio should now look something like this:
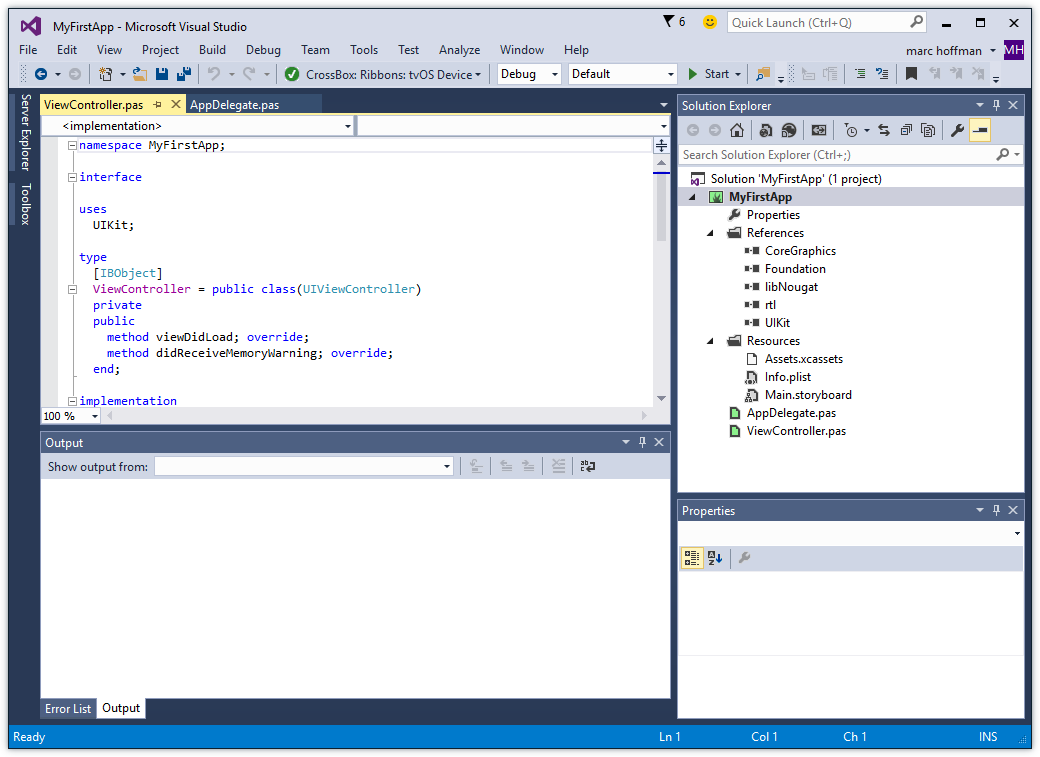
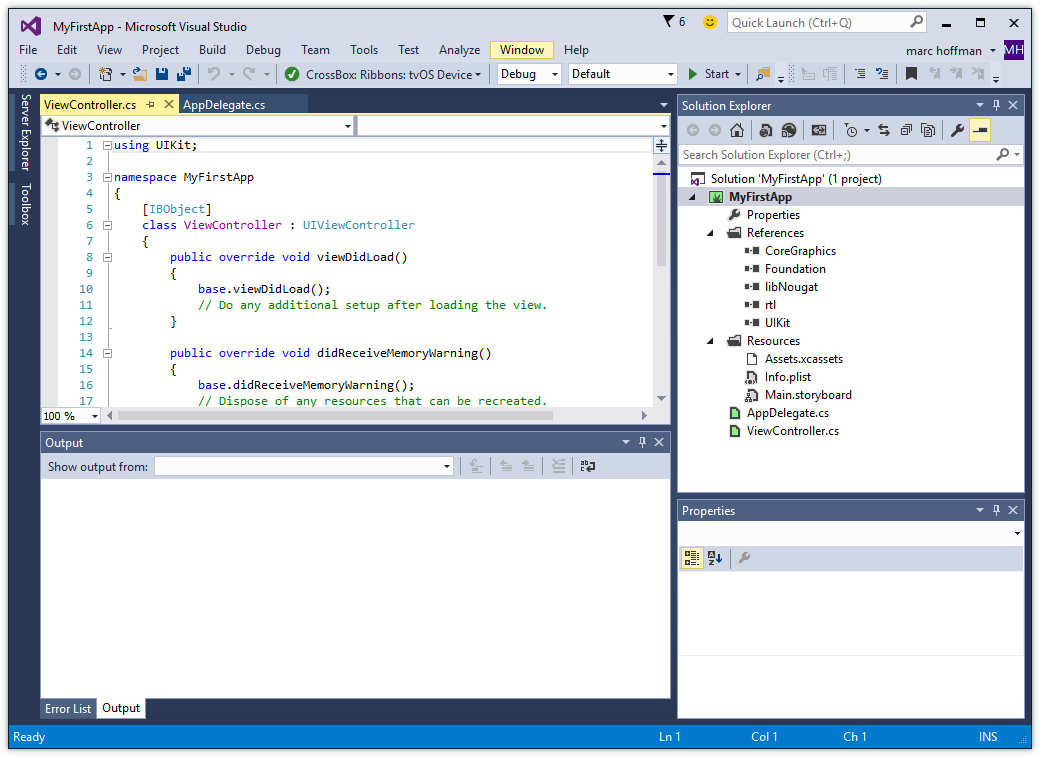
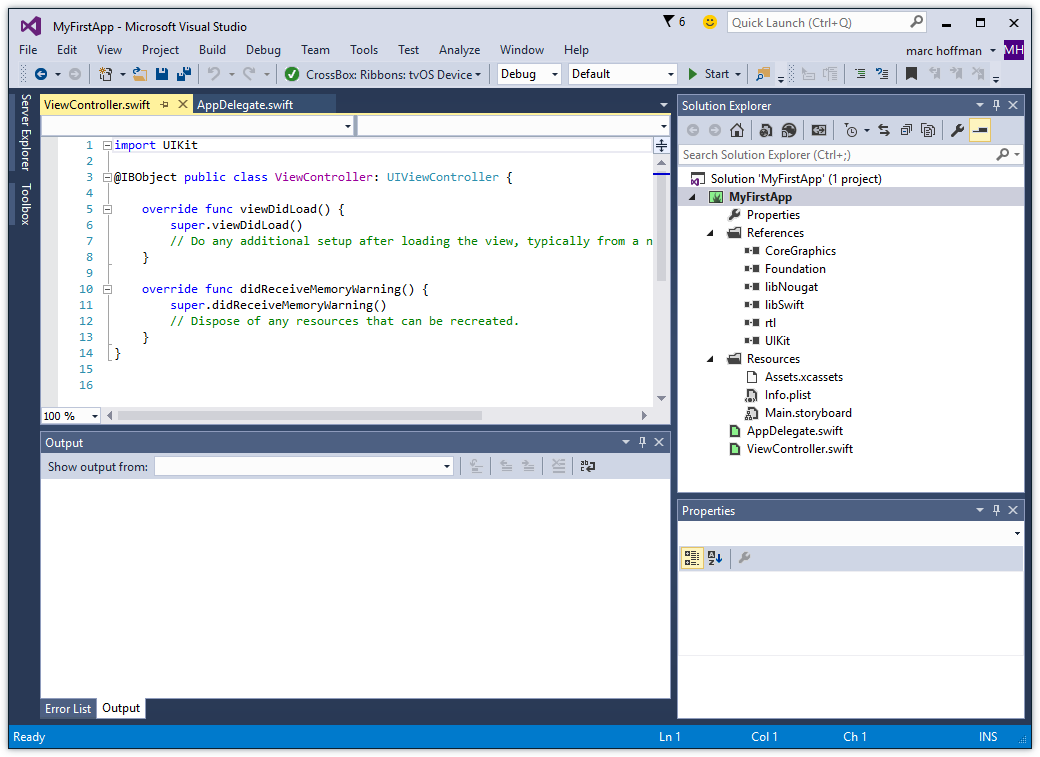
Let's have a look around this window, as there are a lot of things to see, and this is the main view of Visual Studio where you will do most of your work.
The Visual Studio Main Window
On the right side, you see the Solution Explorer. The Solution Explorer is one of several panes that can be docked to this side, and it will show you a hierarchical view of your project.
Elements works with projects inside of a Solution (hence the name). You can think of a Solution as a container for one or more related projects. Visual Studio will always open a solution, not a project – even if that solution might only contain a single project, like in this case.
You can close Solution Explorer to get it out of the way (for example on small screens), and you can always bring it back via the "View|Solution Explorer" main menu item.
The Solution/Project Tree
The Project Tree shows you a full view of everything in your project (or projects). Underneath the root node for the solution, each project starts with the project node itself, with the square Elements Project logo as icon. The icon is color-coded by platform (blue for .NET, green for Cocoa and yellow for Java), as will be the source code files.
Each project has two special nodes, along with any additional files in the project.
-
References lists all the external frameworks and libraries your project uses. As you can see in the screenshot, the project already references all the most crucial libraries by default (we'll have a look at these later), and you can always add more by right-clicking the References node and choosing "Add Reference..." from the context menu. Please refer to the References topic for more in-depth coverage.
-
Properties is a regular folder that can (and does) contain files, but it also gives you access to all the project settings and options for the project, which pen in a new tab when you double-click the node. The project settings are covered in great detail here.
-
In addition, your project will contain one or more (usually more) other files, both source code and other types, that make up your application. These files may be on the top level next to References and Properties, or nested in additional subfolders.
The Main View
The bulk of the Visual Studio window is filled with the file(s) you work in, showing in different tabs across the top. As you select files in Solution Explorer, they will show as a temporary tab on the right. You can double-click files in Solution Explorer to open them in tabs that stick around longer, and show on the left, as in the screenshot above.
You can navigate between files both via any open tabs at the top, or by Solution Explorer.
Your First tvOS Project
Let's have a look at what's in the project that was generated for you from the template. This is already a fully working app that you could build and launch now – it wouldn't do much, but all the basic code and infrastructure is there.
First of all, there are two source files, the AppDelegate and a ViewController, with file extensions matching your language. And there's a handful of non-code files in the Resources folder.
If you are already used to iOS development, then a lot of this will be very familiar to you already.
The Application Delegate
The AppDelegate is a standard class that pretty much every iOS, tvOS and Mac app implements. You can think of it as a central communication point between the Cocoa (Touch) frameworks and your app, the go-to hub that Cocoa will call when something happens, such as your app launching, shutting down, or getting other external notifications.
There's a range of methods that the AppDelegate can implement, and by default the template provides four of them to handle application launch, shutdown, suspension (when the app moves into the background) and resuming, respectively. For this template, they are all empty, because what gets your app off the ground and running happens elsewhere, as we'll see in a second.
If you wanted to add your own code to run when the app starts, you would add that to the implementation of the application:didFinishLaunchingWithOptions: body:
method AppDelegate.application(application: UIApplication)
                   didFinishLaunchingWithOptions(launchOptions: NSDictionary): Boolean;
begin
  result := true;
end;
public BOOL application(UIApplication application)
            didFinishLaunchingWithOptions(NSDictionary launchOptions)
{
    return true;
}
func application(_ application: UIApplication!,
                 didFinishLaunchingWithOptions launchOptions: NSDictionary!) -> Bool {

    return true
}
As it stands, the method just returns true to let Cocoa know that everything is A-OK and the app should start normally.
Another thing worth noticing on the AppDelegate class is the UIApplicationMain Attribute that is attached to it. You might have noticed that your project has no main() function, no entry point where execution will start when the app launches. The UIApplicationMain attribute performs two tasks: (1) it generates this entry point for you, which saves a whole bunch of boilerplate code and (2) it lets Cocoa know that the AppDelegate class (which could be called anything) will be the application's delegate class.
type
  [UIApplicationMain, IBObject]
  AppDelegate = class(IUIApplicationDelegate)
    //...
  end;
[UIApplicationMain, IBObject]
class AppDelegate : IUIApplicationDelegate
{
    //...
}
@UIApplicationMain @IBObject public class AppDelegate : IUIApplicationDelegate {
    //...
}
The View Controller
The second class, and where things become more interesting, is the ViewController. Arbitrarily named so because it is the only view controller for your application (you started with the "Single View" app template, after all), this is where the actual logic for your application's view will be encoded.
It too is fairly empty at this stage, with two placeholder methods that get called when the view loads (viewDidLoad) and when there is a shortage of memory (didReceiveMemoryWarning), respectively. You'll fill this class up with real code in a short while. But first let's move on to the other files in the project.
The Resources
There are four resource files in the project, nested in the Resources subfolder. This is pure convention, and you can distribute files within folders of your project as you please.
-
The
Assets.xcassetsfile is an Xcode Asset Catalog – essentially a collection of images (and possibly other assets) in various sizes. Like most resource files, you can edit this file in Xcode (we'll see how in a few moments). By default, it only contains the application icon, in the various sizes to support iPhones and iPads at different resolutions. -
Main.storyboardcontains the real UI of your application that will show once it is launched. This file will also be designed in Xcode, and it will have connections to your code, so that it can interact with the application logic you will write. -
Finally,
Info.plistis a small XML file that provides the operating system with important parameters about your application. The file provides some values that you can edit (such as the name of the Launch Screen and Main Storyboard above, or what types of devices your app will run on), and as part of building your application, Elements will expand it and add additional information to the file before packaging it into your final app. You can read more about this file here.
<!DOCTYPE plist PUBLIC "-//Apple//DTD PLIST 1.0//EN" "http://www.apple.com/DTDs/PropertyList-1.0.dtd">
<plist version="1.0">
  <dict>
    <key>UIMainStoryboardFile</key>
    <string>Main</string>
    <key>UIDeviceFamily</key>
    <array>
        <integer>1</integer>
        <integer>3</integer>
    </array>
    ...
The Main Storyboard
As stated earlier, no startup code is necessary in the AppDelegate method, because Cocoa already knows how to get your app up and running. And that is via the UIMainStoryboardFile entry in the Info.plist file. As you can see above, it points to Main, which is the Main.storyboard file in your project. Let's have a look.
Editing .storyboard files is done in Xcode, using Apple's own designer for Mac and iOS.
For this step (and for many other aspects of developing for tvOS) Xcode needs to be installed on your system. Xcode is available for free on the Mac App Store, and downloading and running it once is enough for Fire to find it, but we cover this in more detail here in the Setup section.
When you right-click the project node in Solution Explorer, you will see a "Sync User Interface Files to Xcode" item.
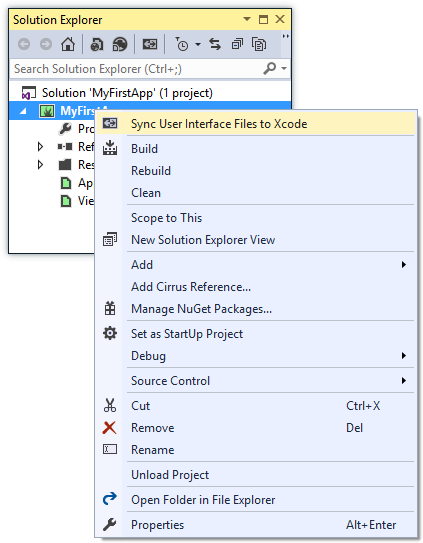
Selecting this will generate a .xcodeproj project file in the /obj folder of your project that you can use to open the UI files in Xcode to edit them.
The best way to do this is to use a shared folder for your project that is located on your Mac and can be accessed via a network mount in Visual Studio in your Windows PC or VM. This way, yo can just switch over to your Mac and double-click the file to open it.
When you do, Xcode will come up and look something like this:
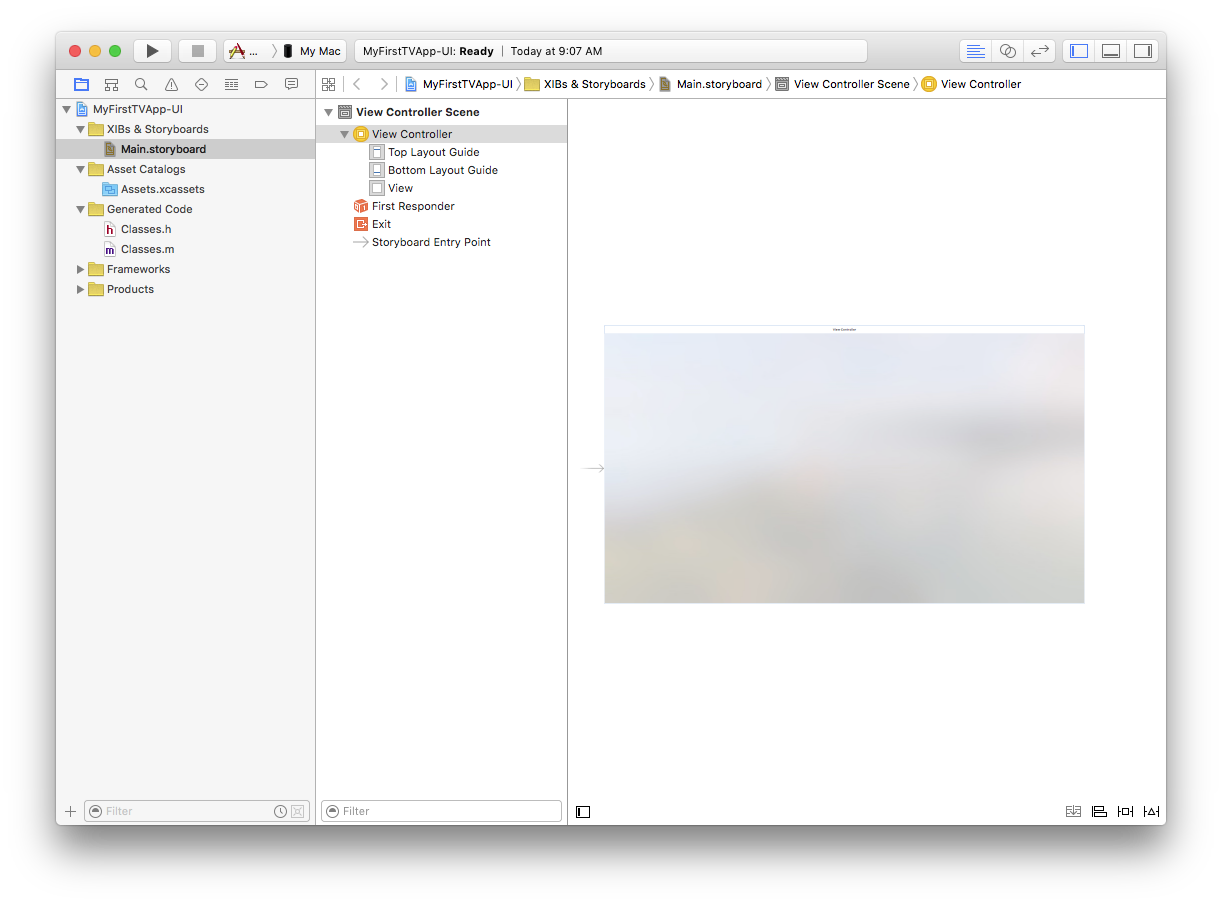
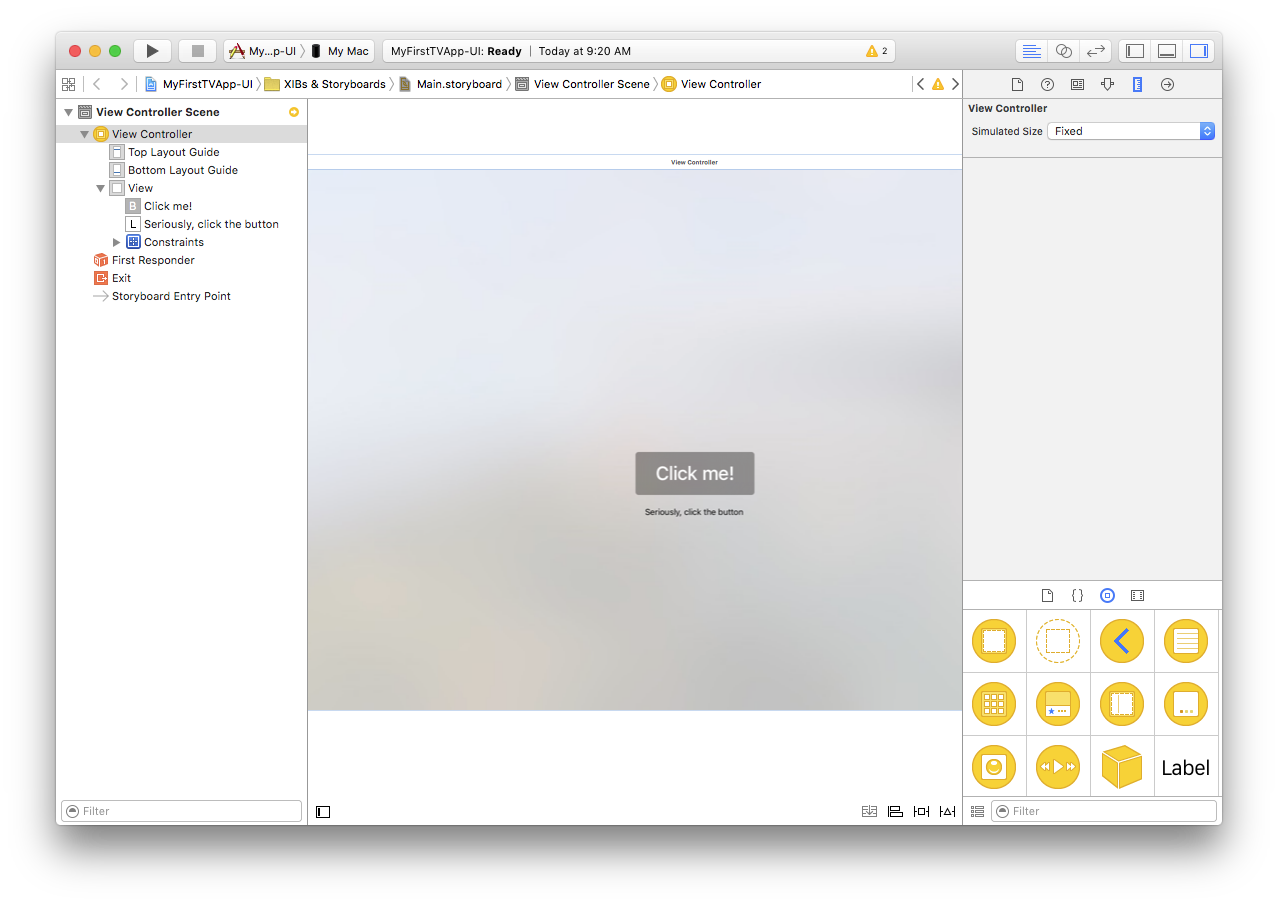
On the left, you see all your resource files represented – there's the Main storyboard and the Asset Catalog. Selecting an item will open it on the right, as is happening with the Main.storyboard in the screenshot above. To make more room, let's hide the file list (⌘0 just like in Fire) and the Document Outline (via the small square button in the bottom left). Also, press ⌥⌘1 to show the Utility pane on the right instead:
The view for the screenshots is a bit constraint, but you should see the 1080p main view for your application, alongside an arrow pointing to it from the left, which indicates that this is the initial screen for your app that Cocoa will show when it loads your storyboard.
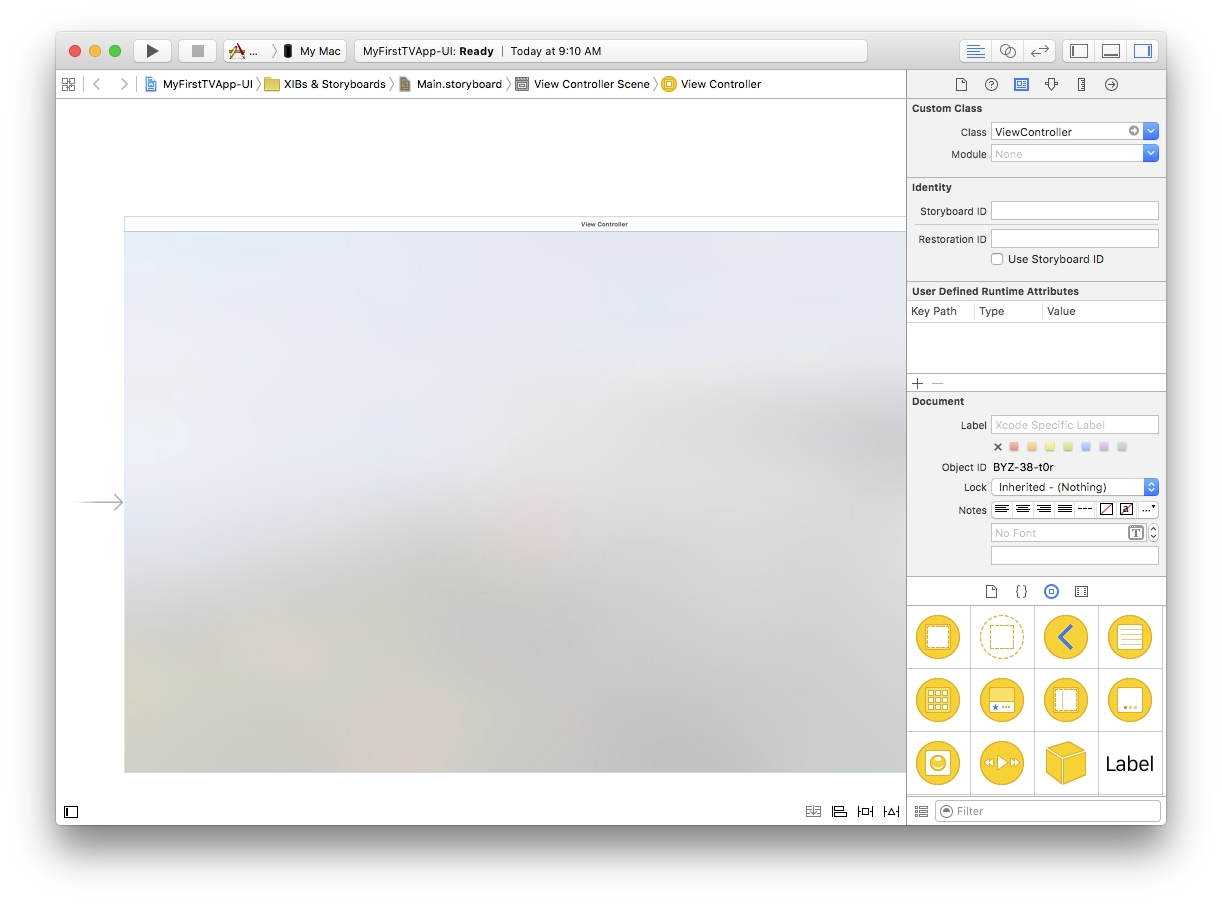
If you select the view controller by clicking its title bar and then select the third tab in the Utility View (⌥⌘3), you will see that its "Class" property is set to "ViewController". This is the ViewController class in your code.
So let's go back to Visual Studio on Windows and start adding some (very simple) functionality to this view controller. You can close Xcode, or leave it open for later.
Back in Visual Studio, select the ViewController source file, and let's start adding some code. We're going to create a really simple app for now, just a button and a label. Clicking the button will update the label with a greeting message.
Let's start by adding a property, so that we can refer to the label from code:
public
  [IBOutlet] property label: UILabel;
[IBOutlet] public UILabel label { get; set; }
@IBOutlet var label: UILabel
Note the IBOutlet attribute attached to the property. This (alongside the IBObject attribute that's already on the ViewController class itself) lets the compiler and Xcode know that the property should be made available for connections in the UI designer (IB is short for Interface Builder, the former name of Xcode's UI designer).
Next, let's add a method that can be called back when the user presses the button:
[IBAction]
method ViewController.sayHello(sender: id);
begin
  label.text := 'Hello from Oxygene';
end;
[IBAction]
public void sayHello(id sender)
{
    label.text = "Hello from C#";
}
@IBAction func sayHello(_ sender: Any?) {
    label.text = "Hello from Swift"
}
Similar to the attribute above, here the IBAction attribute is used to mark that the method should be available in the designer.
Note: If you are using Oxygene as a language, methods need to be declared in the interface section and implemented in the implementation section. You can just add the header to the interface and press Control-Shift-C and the IDE will automatically add the second counterpart for you, without you having to type the method header declaration twice.
Now all that's left is to design the user interface and hook it up to the code you just wrote. To do that, just select "Sync User Interface Files to Xcode" again and then switch over to Xcode.
Now drag a label and a button from the bottom-right class palette onto the View, and align them so that they look something like this:
(Tip: you can zoom the view by right-clicking or control-clicking into the empty white space of the designer and choosing a scale factor, if you cannot fit the whole view on your screen.)
Then select both controls via ⌘-clicking on each one in turn, press the first button in the bottom right, check "Horizontally Center in Container" and click "Add 2 Constraints". This configures Auto Layout, so that the controls will automatically be centered in the view, regardless of screen size. In a real app, you would want to set more constraints to fully control the layout, such as the spacing between the controls, but for this simple app, just centering them will do.
Finally, it's time to connect the controls to your code. There are two connections to be made in total – one from the property to the UITextField and UILabel, and one from the UIButton back to the action.
For the first, click on the yellow view controller icon (which represents your ViewController class) while holding down the Control (^) key, and drag onto the text field, as shown below:
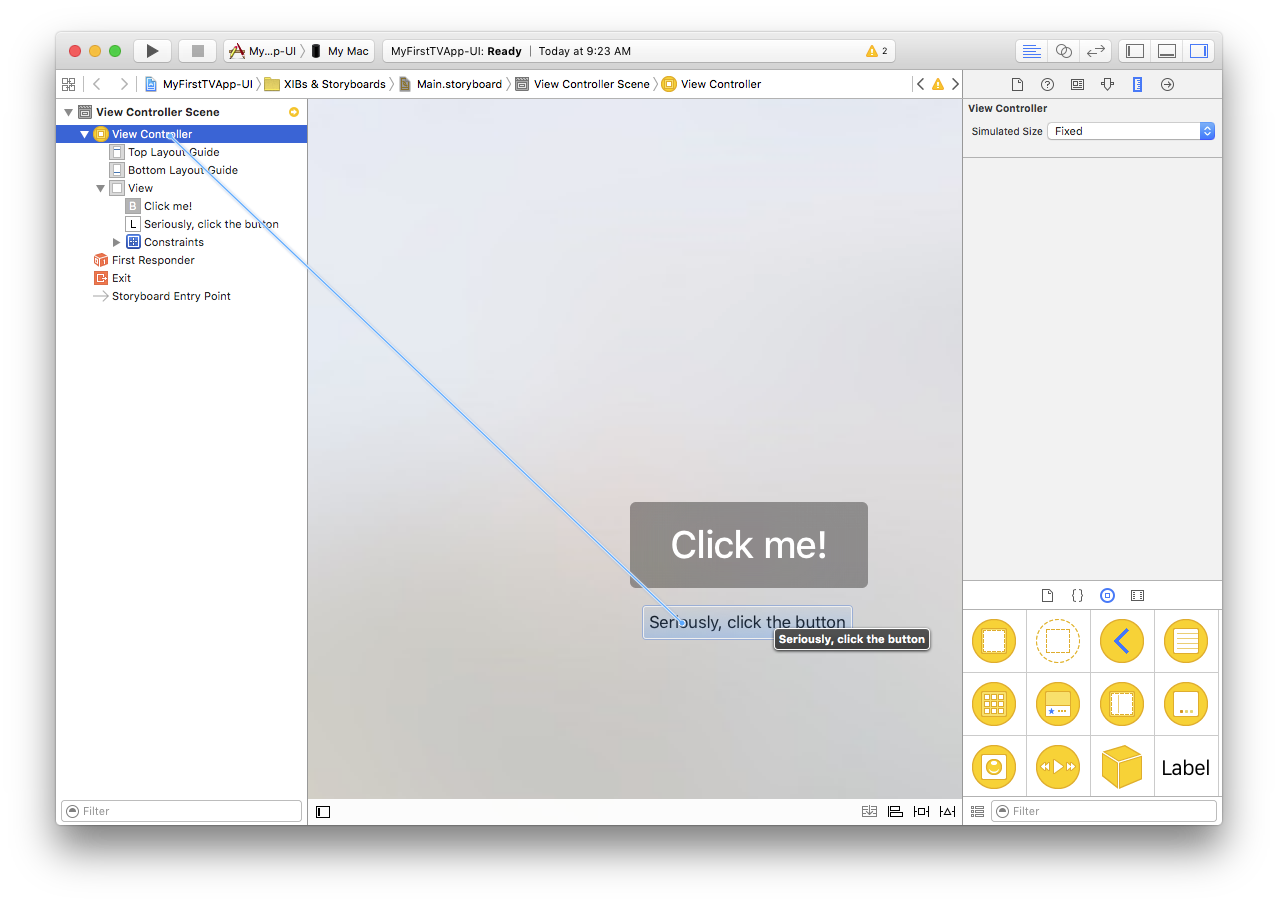
When you let go, a small popup appears, listing all properties that match up for connecting. In this case, it will be the view property (which links the base view for the controller, and you don't want to mess with that), and the label one you defined earlier.
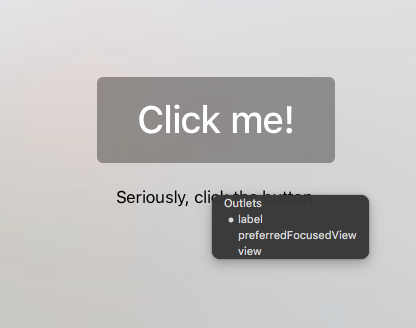
Click on "label" to make the connection.
Connecting the action works the same way, just in reverse. This time, Control-drag from the button back to the yellow view controller icon. Select "sayHello:" from the popup, and you're done.
And with that, the app is done. You can now close Xcode, go back to Visual Studio, and run it.
Running Your App
If you already picked the Apple TV Simulator back when you started your project, you're ready to just hit F5, and Elements will build your app, install it on the Simulator on your Mac (via CrossBox, and run it in the debugger.
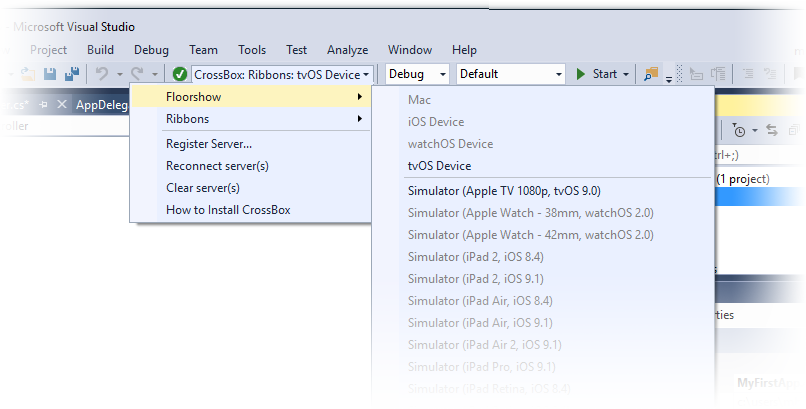
If you want to change what device to run on (for example to switch to your real Apple TV hardware, or to set a different Mac), you can use the CrossBox dropdown button in the toolbar to select a different server or device:
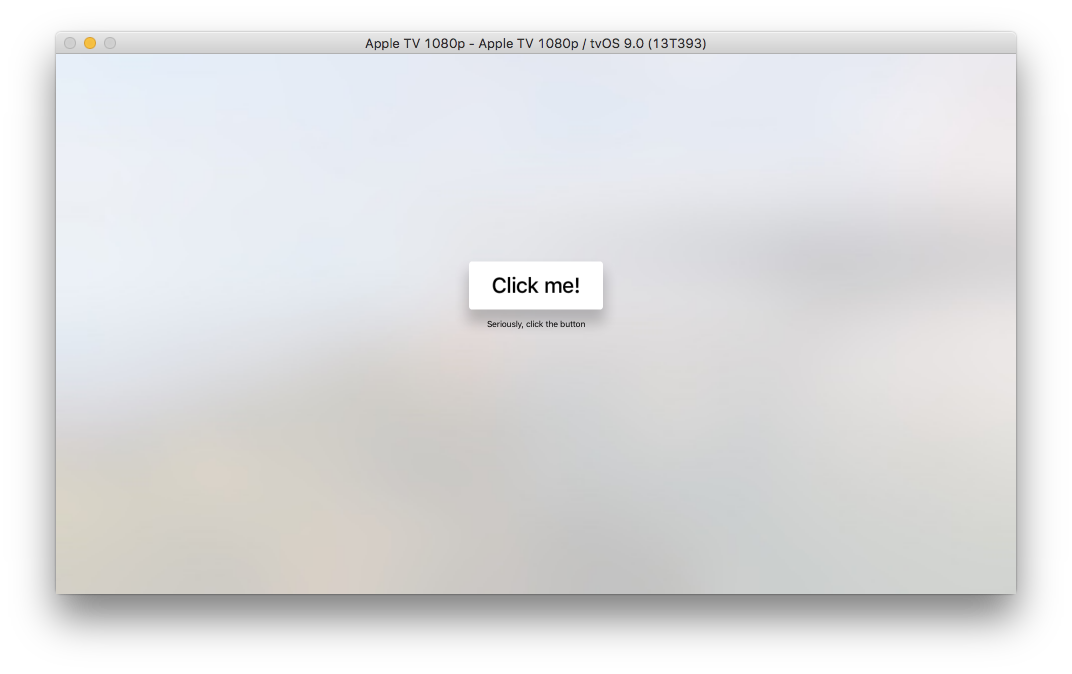
Shortly after pressing F5 (or selecting "Debug|Start Debugging" from the menu), your App should open in the Simulator on your Mac.
Press "Enter" to press the button (the Apple TV Simulator will not respond to mouse clicks, only cursor keys and Enter. Or you can pair an Apple Remote control with your Mac and use that with the Simulator, as well), and the label will update, as per your code.
Running on your device should be just as easy, assuming you have your Apple developer account set up and registered with Xcode as discussed here. Simply select your real device from the CrossBox menu, hit F5 again, and you will see your app get deployed to and launch on your Apple TV.
You will see two warnings being emitted when building for a device. That is because your project has no Provisioning Profile and Developer Certificate selected yet. Fire will pick the default profile and certificate (assuming one is present), so that you can run your application without hassle, but the two warnings will remind you that, eventually, you will want to explicitly select the exact profile and certificate you want to use for this app.
To do so, simply go to the Project Settings Editor via the "Project|Properties" menu, and select the "Cocoa" tab:
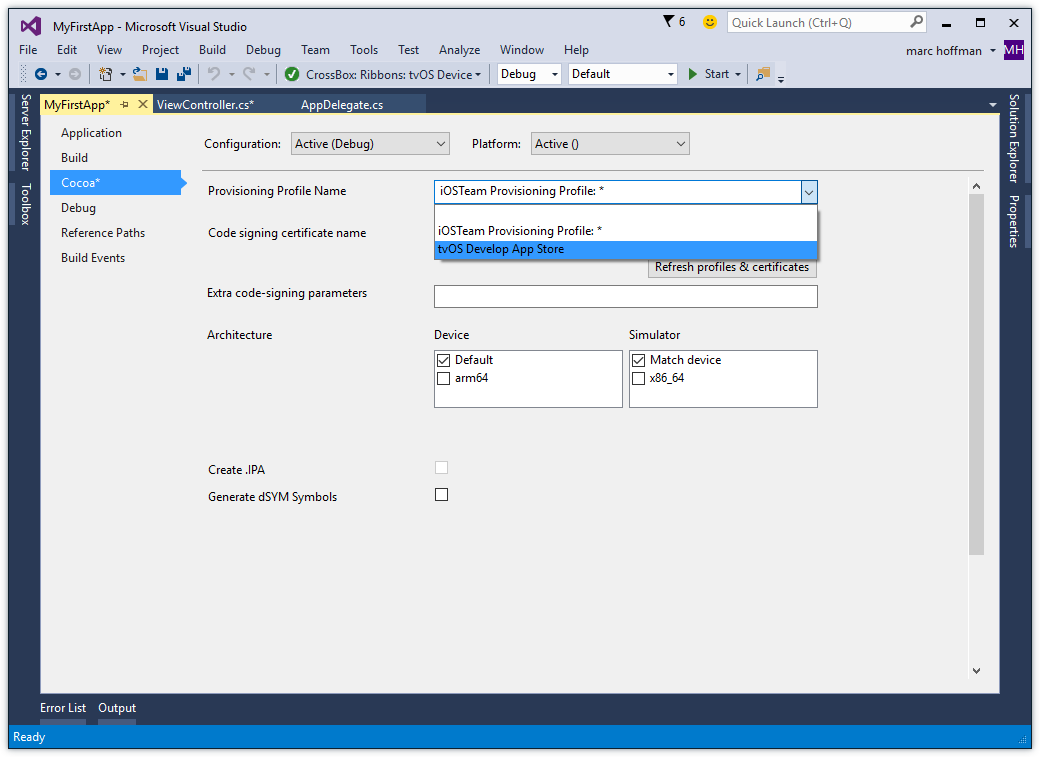
You can select both your Certificate and your Provisioning Profile from the list (once again, see here if your profiles or certificates don't show up as you expect them to).