Your First Android App in Visual Studio
The Android operating system is based on the Dalvik Virtual Machine (VM), which is a mobile-optimised VM similar to the Java VM. Oxygene for Java ships with templates for creating Android projects, and produces both native Java JAR files and the Android APK file necessary for deployment to an Android device.
Because Android runs on such a wide variety of devices with different screen sizes, formats and orientations, it was intentionally designed without a WYSIWYG design surface for building the UI. Instead, an XML file (similar to .NET’s XAML) is edited to lay out the visual elements. There is a free online DroidDraw tool for building Android User Interfaces via a WYSIWYG interface, but editing the XML directly is recommended.
Prerequisites and Emulators
To get started with Android development, you need to install the Java Development Kit and Android SDK, as outlined here (Fire) and here (Visual Studio).
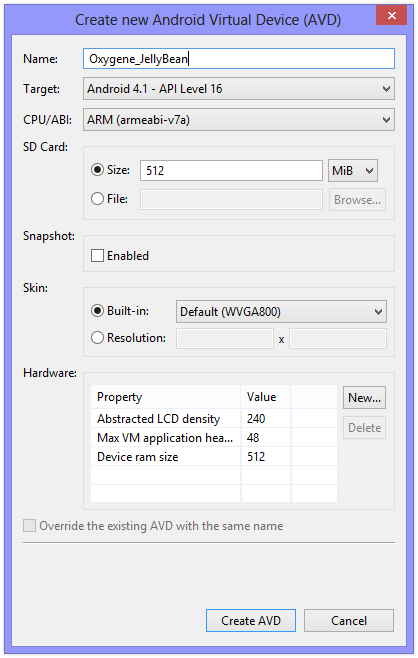
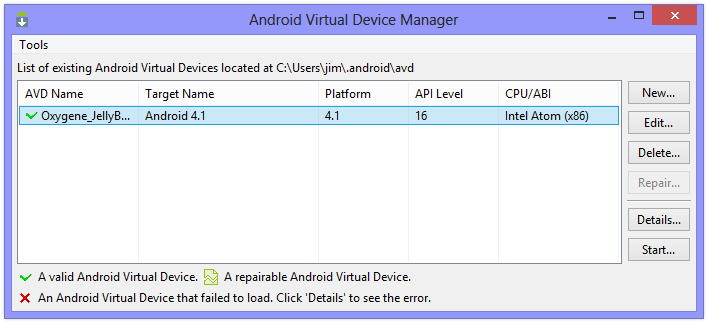
When the tools and platforms are all installed, you will be able to create an Android Emulator, also known as an Android Virtual Device or AVD. You can do this from the Android Virtual Device Manager, which is accessible from the SDK Manager by choosing Tools, Manage AVDs.
Just click New, give the emulator a name and select the API in the Target field. You can choose any installed API level, for example Android 2.2 - API Level 8 (also known as Froyo) or Android 4.0.3 - API Level 15 (also known as Ice Cream Sandwhich). Once you’ve specified the SD Card Size for the emulator (say 512) and chosen a skin (a screen resolution) you can use the Create AVD button to finish the job.
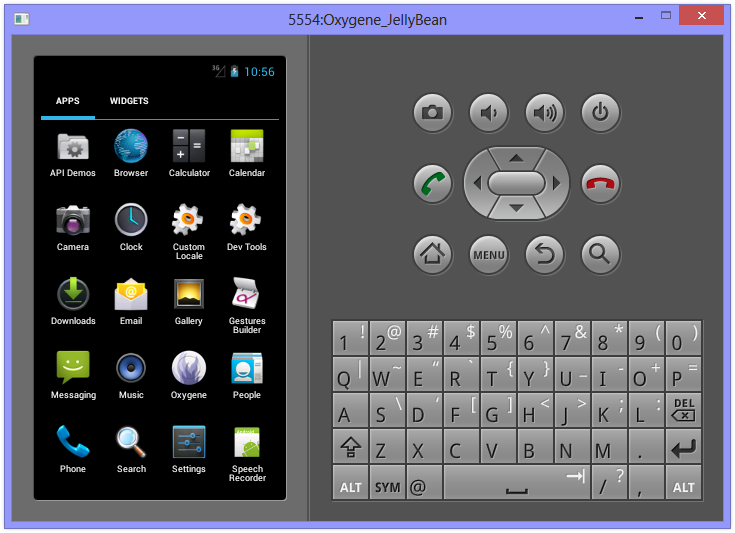
You can launch the emulator from this screen by selecting it and pressing the Start button.
Note: When you re-run the SDK Manager, it will often find updates to install. As mentioned earlier, if the Android SDK was installed into the default location, it will require administrative privileges to install them. So be sure to run it as Administrator (or install the Android SDK into a custom location to make things simpler).
The first time you create or open an Elements project for Android, it will do a ‘pre-flight check’ to ensure that it can locate the things it needs, notably the JDK and the Android SDK. If you’ve installed them into custom locations and it fails to find them, this gives you an opportunity to specify the installation folders.
Getting Started
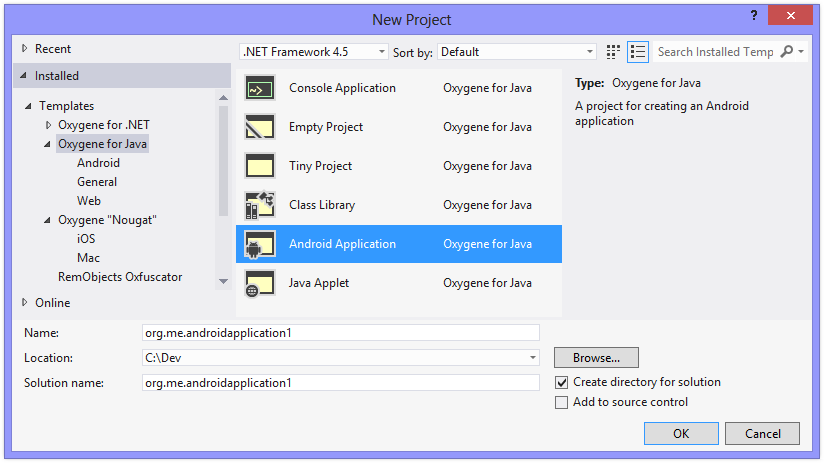
In both Visual Studio and Fire, the New Project dialog provides the Android app template under Oxygene for Java and Android.
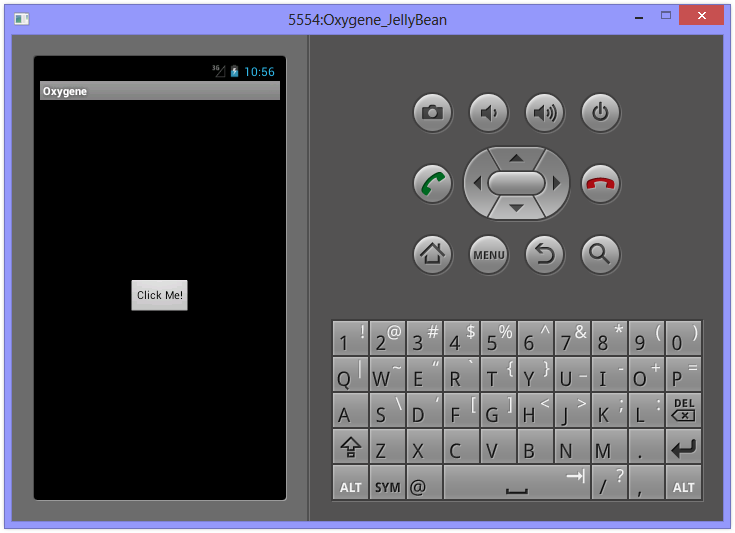
The new Android project is created with a single simple activity called MainActivity. An Activity is the most basic part of an Android app – a single, focused thing that the user can do. The pre-created MainActivity contains a small amount of code to set up a simple UI with a button that, when clicked, displays an incrementing count on its caption.
The visual representation of the screen for MainActivity is defined in the XML file ''main.layout-xml'' which is in the ''res/layout'' folder.
<?xml version="1.0" encoding="utf-8"?>
<LinearLayout xmlns:android="http://schemas.android.com/apk/res/android" android:orientation="vertical"
  android:layout_width="fill_parent" android:layout_height="fill_parent"
  android:gravity="center_vertical">
  <LinearLayout android:orientation="horizontal"
    android:layout_width="fill_parent" android:layout_height="wrap_content"
    android:gravity="center_horizontal">
    <Button android:id="@+id/MyButton" android:text="@string/my_button_text"
      android:layout_width="wrap_content" android:layout_height="wrap_content"></Button>
  </LinearLayout>
</LinearLayout>
Controls are named with the android:id attribute in layout XML. You prefix @+id/ in front of the chosen name and you can then reference the control’s ID in code by prefixing it with R.id. (all IDs become members of the id class, which is nested within the R resource class). To access the control, you can pass the ID into the activity’s findViewById() method. For example, the button named in the layout XML above has an ID accessible in code as R.id.MyButton. To get access to the button object you’d use Button(findViewById(R.id.MyButton)) - notice the typecast to get a Button object, which is needed because findViewById() returns a View object, one of the Button class’s ancestor types.
Strings referenced in the XML attributes with the @string/ prefix or in the code as members of the R.string class are defined in the ''strings.android-xml'' resource file, which can be found in the ''res/values'' folder.
<?xml version="1.0" encoding="utf-8"?>
<resources>
  <string name="app_name">org.me.androidapplication1</string>
  <string name="my_button_text">Click Me!</string>
  <string name="my_button_text_2">%1$d clicks!</string>
</resources>
To reference the string resource in code from an activity method, you simply call getString(R.string.my_button_text). getString() is a method of the Activity class (or, more accurately, a method of one of Activity’s ancestor classes, Context). As you can see, you pass a string resource ID to the method and it returns the resultant corresponding string.
'''Note''': In Delphi and in .NET languages we are used to working with properties. A property represents some data with possible side effects when read from and/or when written to. A property Foo is defined in terms of a getFoo() getter function that returns a value and a setFoo() setter function that is passed a value. Java does not support the notion of properties, so classes have many getter and setter methods exposed instead of their equivalent properties. When working with Oxygene for Java, you have the choice of calling the getter/setter type methods that exist in any Java libraries that you reference, such as the Android SDK, or using the property that you might normally expect to exist. So in the case above, you can access a string resource either by calling:
type
  MainActivity = public class(Activity)
  private
    Count: Integer := 0;
  public
    method onCreate(savedInstanceState: Bundle); override;
    method ButtonOnClick(v: View);
  end;

...

method MainActivity.onCreate(savedInstanceState: Bundle);
begin
  inherited;
  // Set our view from the "main" layout resource
  ContentView := R.layout.main;

  // Get our button from the layout resource,
  // and attach an event to it
  var myButton: Button := Button(findViewById(R.id.MyButton));
  myButton.OnClickListener := new interface View.OnClickListener(onClick := @ButtonOnClick);
end;

method MainActivity.ButtonOnClick(v: View);
begin
  inc(Count);
  (v as Button).Text := WideString.format(String[R.string.my_button_text_2], Count);
end;
onCreate is the method called when the activity is first created and where your activity initialisation goes. After calling through to the inherited method, you can see that a layout resource ID is assigned to the ContentView property, although given the note above, it should be clear that really we are are passing the resource ID to setContentView(). This sets up the layout file ''res.layout-xml'' as the UI for this main activity.
Next the code locates the button with the ID MyButton and stores a reference to it in a local variable.
The final job of onCreate() is to set up the button’s click event handler, which is done by assigning an expression to the button’s OnClickListener property, or in truth passing it to the setOnClickListener() method. Because Java uses interfaces to define event signatures, we use Oxygene’s inline interface implementation to associate our ButtonOnClick method with the onClick method of the button’s View.OnClickListener event interface.
The event handler method itself, ButtonOnClick, increments the Count class instance variable and then uses the value to create a formatted string, which is then set as the button’s caption via its Text property (or setText() method). The string formatting uses the value of the my_button_text_2 string resource (shown earlier), which uses Android format string syntax. The formatting method being called is really String.format(). It’s being called as WideString.format() to avoid ambiguity with the String property (getString() method) of the Activity class we looked at just above. WideString is provided by Oxygene as a synonym for the String type.
One really important value in the ''strings.android-xml'' file is the app_name string. This is used twice by the application:
- the activity’s title bar has this string written on it and
- the list of installed apps on the device uses this string to identify the app.
Be sure to update app_name to make it meaningful.
You can find the references to app_name that affect the title bar and the installed app list in the [http://developer.android.com/guide/topics/manifest/manifest-intro.html Android manifest file], ''AndroidManifest.android-xml'' in the ''Properties'' folder. Every Android application has a manifest file to let Android know the identity of the application package, the components in the application, any permissions required in order to operate and some other system details.
<?xml version="1.0" encoding="utf-8"?>
<manifest xmlns:android="http://schemas.android.com/apk/res/android"
        package="org.me.androidapplication1">
  <application android:persistent="true"
        android:label="@string/app_name"
        android:icon="@drawable/icon"
        android:debuggable="true">
    <activity android:label="@string/app_name" android:name="org.me.androidapplication1.MainActivity">
      <intent-filter>
        <action android:name="android.intent.action.MAIN" />
        <category android:name="android.intent.category.LAUNCHER" />
      </intent-filter>
    </activity>
  </application>
  <uses-sdk android:minSdkVersion="4" />
</manifest>
In this sample application’s manifest you can see the application is given a text label and an icon, and the single activity is identified by its class name and also given a label. The convoluted looking intent filter declaration inside this activity is simply the standard code necessary to tell Android this activity is the main activity of the app.
When you need to add more strings to your project, simply edit the ''strings.android-xml'' file.
'''Note''': The various Android resource files that reside within the ''res'' folder hierarchy are all XML files. They would all be perfectly valid and usable if given the standard .xml extension. The reason for the .layout-xml and .android-xml extensions is to enable the appropriate IntelliSense (or Code Completion) behaviour when working in these files.
Running Your App
When you build your app, the Oxygene compiler first creates a normal Java JAR file and then the Android toolchain creates an Android APK file (Android PacKage). The JAR file is just compiled code (Java byte code) but the APK file is the Java byte code processed to run on Android’s Dalvik Virtual Machine with all the necessary resources packaged into the file. Once the package is built, it is ready to run either on an AVD (in other words on the emulator) or on a physical device.
'''Note''': To deploy an APK file from your Windows machine to a physical device, such as a phone or tablet, you must first install the manufacturer’s USB driver for the device to allow communication between the PC and the device. Then you connect the device to the PC using an appropriate USB cable. You should be able to locate instructions on how to install the driver on your manufacturer’s web site or by using a search engine.
The Oxygene debugger will automatically deploy the APK to the emulator and launch it when you use the Start Debugging or Start Without Debugging buttons in Visual Studio (or use the F5 or Ctrl+F5 keystrokes, respectively). If you choose Start Debugging (or F5), you can set breakpoints and debug your application from Visual Studio as it runs on the emulator or physical device.
If you have a virtual Android device running and also have a physical Android device connected to the computer, you need some way to tell Oxygene which device to target when you start an application. You can choose an Android device in the Android section of the project properties.
If you want to install the APK manually, you can use the Android Debug Bridge (ADB) command-line tool from a Windows command prompt. The adb.exe tool is located in the ''<Android_SDK_installation_path>\android-sdk-windows\platform-tools'' folder, where ''<Android_SDK_installation_path>'' could be ''C:\Program Files'' or another directory you chose at installation time. It may be of benefit to add both ''<Android_SDK_installation_path>\android-sdk-windows\platform-tools'' and also ''<Android_SDK_installation_path>\android-sdk-windows\tools'' to the system search path to enable Android SDK tools to be executed by name no matter what the current directory is.
Simply run adb with the install parameter and the name of the APK to load. If the APK is already installed, you should also specify the -r. Assuming adb’s directory has been added to the search path, you would use:
adb install -r org.me.androidapplication1.apk
'''Note''': If you have an emulator running and a physical device attached to the PC, you can use the -d and -e switches to specify either the device or the emulator, respectively, for example:
adb -e install -r org.me.androidapplication1.apk
Once the APK is installed, you can run it just like you would any other app.
UI Elements
The <LinearLayout> tag in ''main.layout-xml'' is one of several layout options. Some of the other layouts are FrameLayout, TableLayout and RelativeLayout.
- FrameLayout - A frame layout is designed to block out an area on the screen to display a single item.
- LinearLayout - A layout that arranges its children in a single column (vertical) or a single row (horizontal). The default orientation is horizontal.
- RelativeLayout - A layout where the positions of the children can be described in relation to each other or to the parent.
- TableLayout - A layout that arranges its children into rows and columns. A TableLayout consists of a number of TableRow objects, each defining a row. TableLayout containers do not display border lines for their rows, columns, or cells. Each row has zero or more cells; each cell can hold one View object. The table has as many columns as the row with the most cells. A table can leave cells empty. Cells can span columns, as they can in HTML.
Once you have the layout, you can add other controls like Button, ImageButton, TextView, ImageView and others.
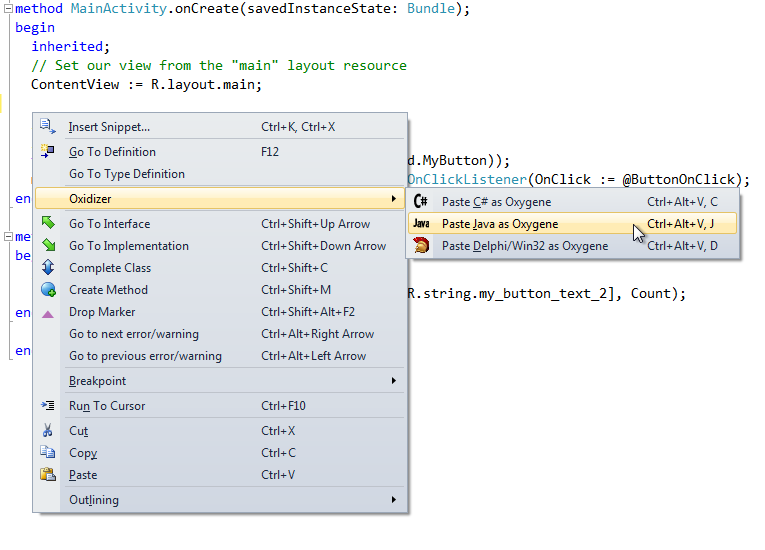
There is a pretty good UI tutorial available. Keep in mind that the code samples will be in Java instead of Oxygene. However, you should find that the Oxidizer IDE feature can help in porting Java code over to the Oxygene syntax. If you have a snippet of Java code in the clipboard, you can press Alt+Ctrl+V, then J and the Oxidizer will do its utmost to translate the code for you. It won’t necessarily do a perfect job as it’s working without context, but it should do the main bulk of the translation for you.
Now for some Toast
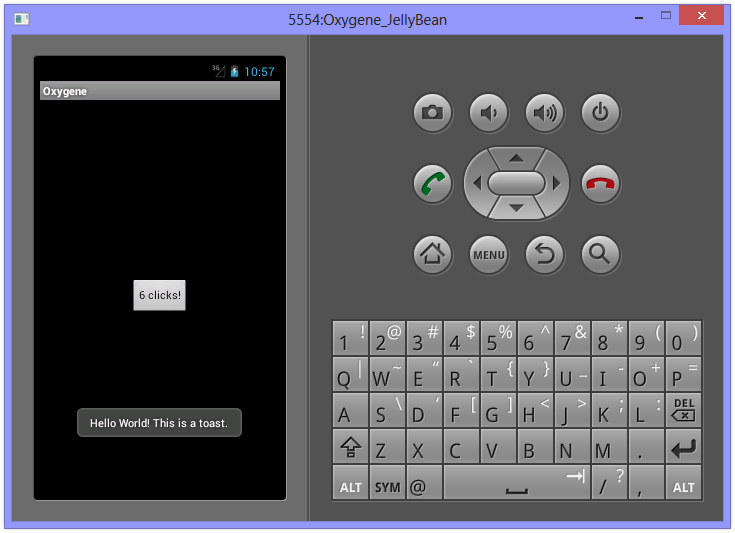
When you want to popup a message to your users from an Android app, you make toast. A toast is a small popup window that shows up in front of the current activity for a short time. Simply call the makeText method on the Toast class to create a toast object, then call show() to pop it up on-screen. There are two versions of makeText and each takes 3 parameters. Here is a sample call:
Toast.makeText(self, "Hello World! This is a toast.", Toast.LENGTH_SHORT).show();
The first parameter is the context that the toast relates to. You can either pass your activity (using self if working in the activity’s method) or a reference to the single application object that exists in the app (accessible via the activity’s getApplicationContext() method), since both Activity and Application inherit from the Context class.
The second parameter is the text string to display. This can either be a literal string as above or, preferably, a string resource ID, depending on which version of makeText you are using. So to pass a resource ID, you would reference a string defined in ''strings.android-xml'' by using String[R.string.some_identifier].
The last parameter is the duration before the toast is auto-dismissed, either Toast.LENGTH_SHORT or Toast.LENGTH_LONG.
The call to makeText returns a Toast object. There are other methods on the Toast object to configure it. The show method ultimately displays the toast.
Just add the code above to the ButtonOnClick event handler in MainActivity and when you run it in the emulator or on a device, you will see the toast appear when you click the button.
A toast never receives focus and always disappears after the duration timeout.
Documentation
For Android documentation, you can make use of the mass of information provided by Google in their API Reference and API Guides. Naturally, this documentation is targeted at Java programmers, but that should really be just a minor inconvenience - the method signatures are laid out in C-style syntax rather than Pascal-style. Oxygene can natively access any of the Android SDK class and call any of the available methods, so the best documentation is the documentation written by the platform provider: Google.
In this primer, various different class types and methods have been linked through to the corresponding Android SDK documentation. You should become familiar with using the Android SDK documentation to learn about how to program Android applications in Oxygene for Java.
Notes
One important thing to remember for Android as you start building larger projects and making use of additional libraries is that if you don’t set the “Copy Local” property to true for a referenced library, the compiler presumes the library is available on the system and does not include it in the generated archive. If you set it, it becomes part of the application. For the main platform library, such as android-14, “Copy Local” must be left as false, but for all other libraries it must be set to true to ensure the referenced code will be available when the app runs on an Android device.