Working with Devices
Both Fire and Water provide built-in support for deploying, running and debugging your apps on devices other than your local Mac or PC. This includes real physical iOS and Android devices, the iOS Simulator and Android Emulators, as well as remote computers (for example to test a Mac app from Water, or a Linux app from either Fire or Water).
In the toolbar at the top of each project window, you will see the "CrossBox" device menu. In Fire, it is in the middle of the tool bar, in Water it is the first of three combo boxes at the right side of the menu bar:
By default, it will show "Mac" or "Windows PC or VM", potentially followed by a device name, such as the name of your iPhone:
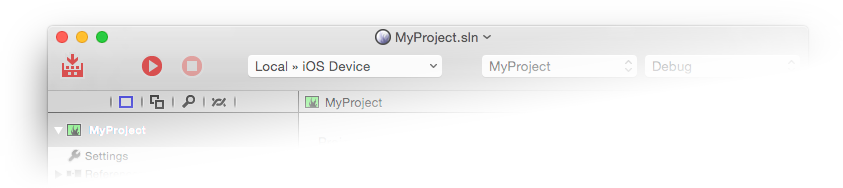
Depending on the target platform for the project(s) in the open solution, this popup will show you either the single option of "Mac" (in Fire) or "Windows PC or VM" (in Water) or a selection of either iOS or Android devices and/or remote CrossBox 2 servers.
Selecting a device from the dropdown will affect which target device will be used to run and debug your application when you do so, and – in the case of iOS – will also determine which version of your project will be built (device vs. simulator).
iOS Projects
For iOS projects, the device popup will show three sections: a list of all available iOS Simulators, a generic "iOS Device", and any actual physical devices you may have connected to your Mac via cable. With latest versions of the SDKs, you can also run iOS applications, unchanged, on visionOS devices and Simulators.
In Fire, these will be the devices connected right to your local Mac; in Water, you will need to Connect to your Mac via CrossBox to see the devices on that Mac.
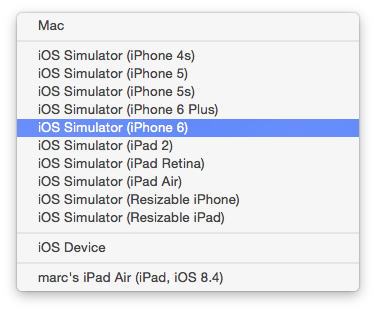
The list of simulators will reflect the simulators you have configured in Xcode itself, and you can use Xcode to change them or add more. This list will refresh each time you start the IDE.
Actual devices will become visible within a few seconds of being connected to your Mac via cable, and the list of devices will change live as you connect and disconnect devices. If you select a device and then disconnect it, or open an existing project and the device you last used is not currently connected, the popup will continue showing that device's name with an annotation of "(not connected)" until you select a different device from the list (or reconnect the device).
The "iOS Device" is provided as a special placeholder to allow you to build your projects for physical hardware (opposed to the simulator), even when no actual device is connected. Selecting this option will let you compile, but for obvious reasons you will not be able to run or debug your application with this option.
Read more about Cocoa Debugging on Devices and Simulators.
visionOS and tvOS Projects
visionOS and tvOS projects work the same way as iOS outlined above – you will see the list of visionOS and tvOS Simulators and any physical devices connected to your Mac. Just like with iOS, Water will need a connection to a Mac to build and run.
Android Projects
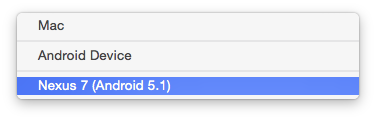
For Android projects, the device popup will show all configured Emulators, a generic "Android Device" option, physical Android devices currently connected to your local Mac or PC, as well as remote devices connected via the WiFi, and any Android Virtual Machines.
Android Devices connected via USB
Devices connected straight to your Mac or PC via USB will automatically show up in the device popup within 30 seconds of being connected, and similarly will disappear automatically after being disconnected.
When you connect a new device for the first time, it might not be authorized to talk to your computer yet. In that case, an item will show in the list reading "Unauthorized Android Device", and a message should show on your device's screen asking for permission to connect.
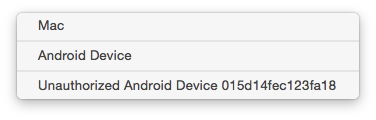
Once you allow the connection on the device, the popup will update to show the device's name and OS version, and the device can then be selected and used for debugging.
Android Emulators
Android Emulators can be managed by the Virtual Device Manager provided by the Android SDK in Android Studio. Unfortunately Google deprecated the standalone Virtual Device Manager, so you need to fight your way through Android Studio to get to it :(.
The IDE will include all configured emulators in the list, whether they are running or not. When Debugging, the selected Android emulator will automatically be booted up for you, if needed. Note that Android emulators can be notoriously slow, both to boot up and to run in general. So be patient.
Android Devices on the Network
You can also connect the Android SDK to devices running on your network so that they will show up as known devices in Fire and Water (and any other Android SDK tools). The IDE does not currently provide any UI to automate this process for you, but you can use the ./adb connect <ipaddress> terminal command to initiate this connection.
Once connected, the device will show up in Fire's device popup within 30 seconds.
Please refer to the Android SDK documentation, the documentation for the adb tool, and the documentation provided by your device's vendor for details. See also Device-Specific Setup.
Troubleshooting Note: The IDE only sees devices listed by the abd devices and emulator -list-advs command line tools, since those are its interface to the Android SDK.
Whenever physical a device does not show in adb devices`, the IDE will not see it, by design, and the problem needs to be sorted out between the system and the Android SDK. Fire and Water can only show the devices reported by the Android SDK, and this is the query point it uses; everything below that is outside of our control.
Read more about Android Debugging.
Island Projects
Both Fire and Water can connect to remote Windows or Linux machines via CrossBox, to run and debug Island projects on the respective platforms. Of course Water can also run and debug Windows projects locally, and can also run Linux projects on the local Linux Sub-System ("Bash for Windows") on Windows 10, when available.
WebAssembly projects can be debugged locally using Chromiu based browsers, or Node.js, which must be installed separately.
Island projects for Android can currently not be debugged directly, except in the context of being hosted in a Java-based Android app.
No remote connection is needed, from Fire or Water, to build Island projects.
Read more about debugging on Windoows, Linux and WebAssembly.
Mac Projects
While Fire can and will of course run Mac projects locally, in Water you need to Connect to a Mac via CrossBox in order to build and run Mac applications.
Read more about macOS Debugging.
Other Projects
Both .NET and Java projects will run always locally on your Mac or PC, so "Mac" or "Windows PC or VM" will be the only option in the device popup for them. In Fire, this includes macOS Cocoa projects (discussed above), as well.
Future versions of Fire and Water and CrossBox might provide the ability to remote-debug .NET and Java applications, as well.
Multi-Platform Projects
If you have a mixed-platform solution, you will see a mixture of all devices supported by any of the platforms, and the popup itself will read "Multiple Devices".
Selecting a device in a multi-platform solution will set the active device for all applicable projects, and leave the other projects untouched. For example, if you have a solution with two iOS projects and two Android projects, and you select your connected iPhone as target device, both iOS projects will be switched to use the iPhone, while the Android project will be unaffected, of course. Selecting your Android tablet will switch over the Android project only.
You can also control the selected device for each project individually in the project's Project Settings view.