Your First Mac App with Fire
The first time you start Fire, before opening or starting a new project, it will present you with the Welcome Screen, pictured below. You can also always open up the Welcome screen via the "Window|Welcome" menu command or by pressing ⇧⌘1.
In addition to logging in to your remobjects.com account, the Welcome Screen allows you to perform three tasks, two of which you will use now.
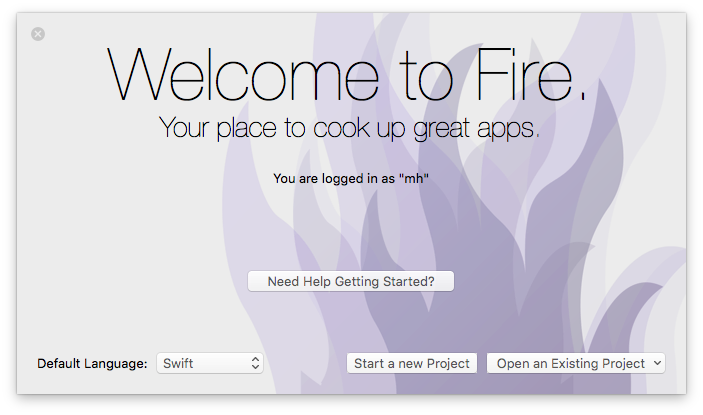
On the bottom left, you can choose your preferred Elements language. Fire supports writing code in Oxygene, C# and Swift. Picking an option here will select what language will show by default when you start new projects, or add new files to a multi-language project (Elements allows you to mix all fivwe languages in a project, if you like).
This tutorial will cover all languages. For code snippets, and for any screenshots that are language-specific, you can choose which language to see in the top right corner. Your choice will persist throughout the article and the website, though you can of course switch back and forth at any time.
After picking your default language (which you can always change later in Preferences), click the "Start a new Project" button to bring up the New Project Wizard sheet:
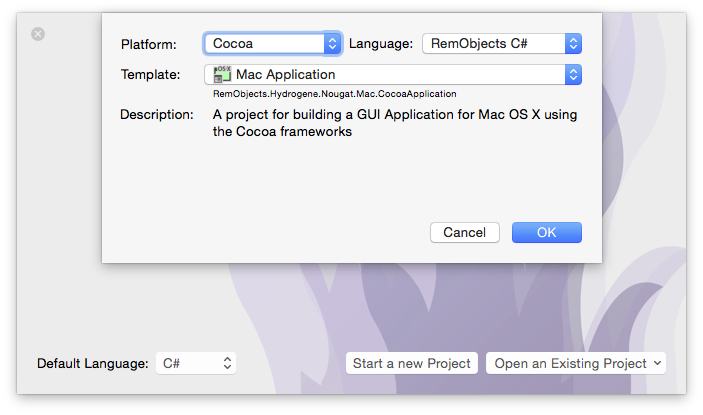
You will see that your preferred language is already pre-selected at the top right – although you can of course always choose a different language just for this one project.
On the top left you will select the platform for your new application. Since you're going to build a Mac app, select Cocoa. This filters the third list down to show Cocoa templates only. Drop down the big popup button in the middle and choose the "Mac Application " project template, then click "OK".
Next, you will select where to save the new project you are creating:
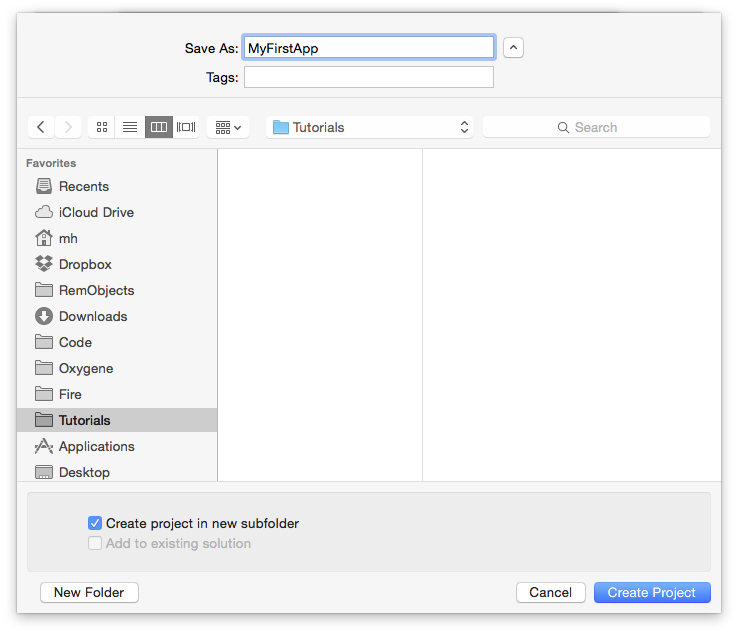
This is pretty much a standard Mac OS X Save Dialog; you can ignore the two extra options at the bottom for now and just pick a location for your project, give it a name, and click "Create Project".
You might be interested to know that you can set the default location for new projects in Preferences. Setting that to the base folder where you keep all your work, for example, saves you from having to find the right folder each time you start a new project.
Once the project is created, Fire opens its main window, showing you a view of your project:
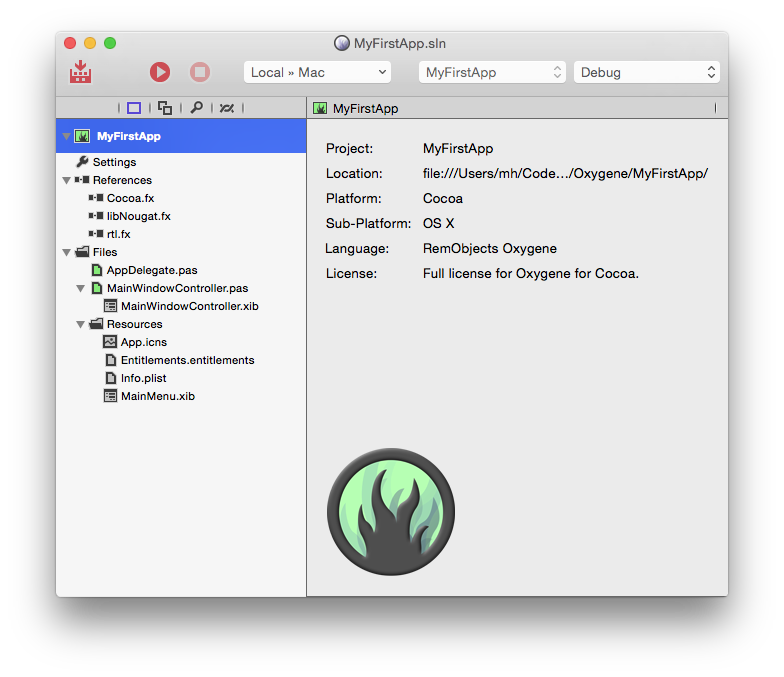
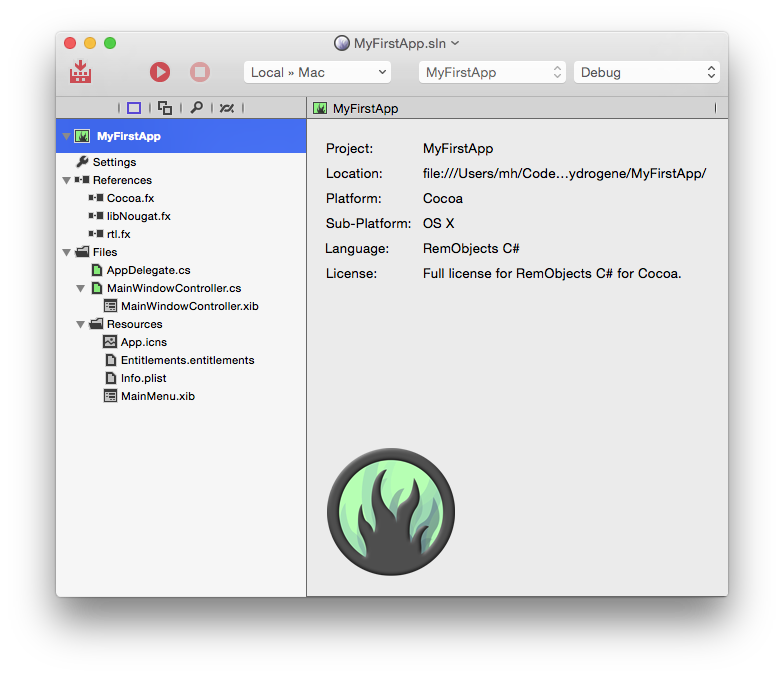
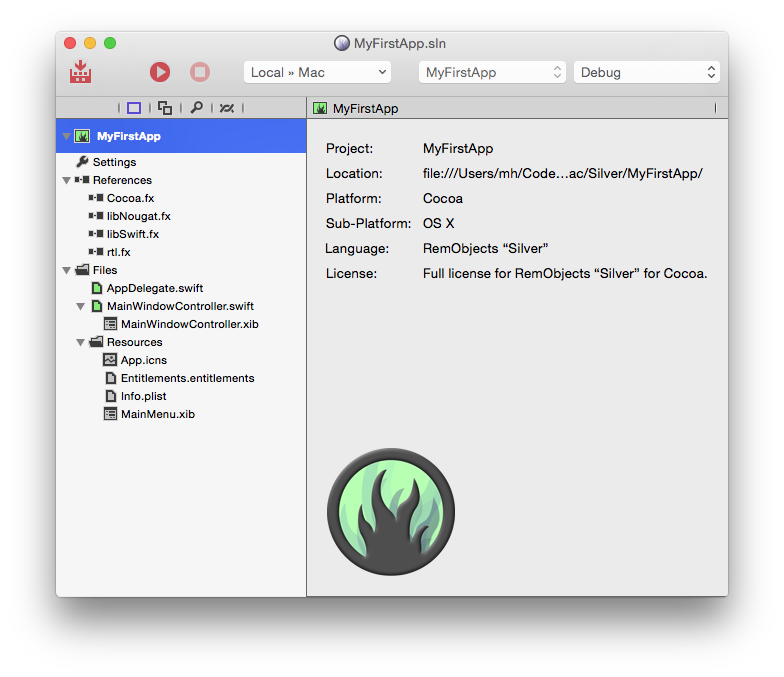
Let's have a look around this window, as there are a lot of things to see, and this windows is the main view of Fire where you will do most of your work.
The Fire Main Window
At the top, you will see the toolbar, and at the very top of that you see the name MyFirstApp.sln. Now, MyFirstApp is the name you gave your project, but what does .sln mean? Elements works with projects inside of a Solution. You can think of a Solution as a container for one or more related projects. Fire will always open a solution, not a project – even if that solution might only contain a single project, like in this case.
In the toolbar itself are buttons to build and run the project, as well as a few popup buttons that let you select various things. We'll get to those later.
The left side of the Fire window is made up by what we call the Navigation Pane. This pane has various tabs at the top that allow you to quickly find your way around your project in various views. For now, we'll focus on the first view, which is active in the screenshot above, and is called the Project Tree.
You can hide and show the Navigation Pane by pressing ⌘0 at any time to let the main view (wich we'll look at next) fill the whole window. You can also bring up the Project Tree at any time by pressing ⌘1 (whether the Navigation Pane is hidden or showing a different tab).
The Project Tree
The Project Tree shows you a full view of everything in your project (or projects). Each project starts with the project node itself, which is larger, and selected in the screenshot above, as indicated by its blue background. Because it is selected, the main view on the right shows the project summary. As you select different nodes in the Project Tree the main view adjusts accordingly.
Each project has three top level nodes.
-
Settings gives you access to all the project settings and options for the project. Here you can control how the project is built and run, what exact compiler options are used, etc. The project settings are covered in great detail here.
-
References lists all the external frameworks and libraries your project uses. As you can see in the screenshot, the project already references all the most crucial libraries by default (we'll have a look at these later), and you can always add more by right-clicking the References node and choosing "Add Reference" from the context menu. You can also drag references in directly from the Finder, as well as, of course, remove unnecessary references. Please refer to the References topic for more in-depth coverage.
-
Files, finally, has the meat of your application. This is where all the files that make up your app are listed, including source files, images and other resources.
The Main View
Lastly, the main view fills the rest of the window (and if you hide the Navigation Pane, all of the window), and this is where you get your work done. With the project node selected, this view is a bit uninspiring, but when you select a source file, it will show you the code editor in that file, and it will show specific views for each file type.
When you hide the Navigation Pane, you can still navigate between the different files in your project via the Jump Bar at the top of the main view. Click on the "MyFirstApp" project name, and you can jump through the full folder and file hierarchy of your project, and more.
Your First Mac Project
Let's have a look at what's in the project that was generated for you from the template. This is already a fully working app that you could build and launch right now – it wouldn't do much, but all the basic code and infrastructure is there.
First of all, there are two source files, the AppDelegate and the MainWindowController, with file extensions matching your language. There's an .xib file nested underneath the MainViewController, and finally there's a handful of non-code files in the Resources folder.
The Application Delegate
The AppDelegate is a standard class that pretty much every Mac (and iOS) app implements. You can think of it as a central communication point between the Cocoa frameworks and your app, the go-to hub that Cocoa will call when something happens, such as your app launching, shutting down, or getting other external notifications.
There's a range of methods that the AppDelegate can implement, and by default the template provides one of them to handle application launch: applicationDidFinishLaunching:.
For this template, applicationDidFinishLaunching: creates a new instance of the main window and shows it:
method AppDelegate.applicationDidFinishLaunching(aNotification: NSNotification);
begin
  fMainWindowController := new MainWindowController();
  fMainWindowController.showWindow(nil);
end;
public void applicationDidFinishLaunching(NSNotification notification)
{
    mainWindowController = new MainWindowController();
    mainWindowController.showWindow(null);
}
public func applicationDidFinishLaunching(_ notification: NSNotification!) {

    mainWindowController = MainWindowController();
    mainWindowController?.showWindow(nil);
}
Another thing worth noticing on the AppDelegate class is the NSApplicationMain Attribute that is attached to it. You might have noticed that your project has no main() function, no entry point where execution will start when the app launches. The NSApplicationMain attribute performs two tasks: (1) it generates this entry point for you, which saves a whole bunch of boilerplate code and (2) it lets Cocoa know that the AppDelegate class (which could be called anything) will be the application's delegate class.
type
  [NSApplicationMain, IBObject]
  AppDelegate = class(IUIApplicationDelegate)
    //...
  end;
[NSApplicationMain, IBObject]
class AppDelegate : IUIApplicationDelegate
{
    //...
}
@NSApplicationMain @IBObject public class AppDelegate : IUIApplicationDelegate {
    //...
}
The Main Window Controller
The second class, and where things become more interesting, is the MainWindowController. Arbitrarily named so because it is the first (and currently only) window controller for your application, this is where the actual logic for your application's UI will be encoded.
It too is fairly empty at this stage, with two placeholder methods – a constructor and a method that get called when the window loads (windowDidLoad). The constructor already has code to load the window from the MainWindowController.xib file, and you'll fill this class up with real code in a short while. But first, let's move on to the other files in the project.
The Resources
There are four resource files in the project, nested in the Resources subfolder. This is pure convention, and you can distribute files within folders of your project as you please.
-
App.icnsis the main icon file for the application and defines what your app will look like in Finder and in the Dock. -
MainMenu.xibis one of two .xib files in the project. As the name indicates, it contains the menu for the application, and it is also the file that will be loaded by Cocoa on application startup to initialize the Application Delegate, which it contains a reference to. It is common practise to add other global views and objects, like an About window or a preference window, to this file as well. -
Entitlements.entitlementsis a mostly empty XML file to start with. The entitlements file drives code signing and can be used to configure application capabilities such as Sandboxing, CloudKit or MapKit access, among others. Check out the Entitlements topic for more details. -
Finally,
Info.plistis a small XML file that provides the operating system with import and parameters about your application. The file provides some values that you can edit (like the name of the MainMenu.xib mentioned above), and as part of building your application, Elements will expand it and add additional information to the file before packaging it into your final app. You can read more about this file here.
<!DOCTYPE plist PUBLIC "-//Apple//DTD PLIST 1.0//EN" "http://www.apple.com/DTDs/PropertyList-1.0.dtd">
<plist version="1.0">
  <dict>
    <key>NSMainNibFile</key>
    <string>MainMenu</string>
    <key>NSPrincipalClass</key>
    <string>NSApplication</string>
    ...
The Main Window Controller
The main window controller – which will be the central place for the code you'll be writing for this app – consists of two parts. There's a source file that defines the MainWindowController class (descended from the NSWindowController Cocoa base class), and there's a MainWindowController.xib file that holds the visual representation of the window.
If you look at the init method for MainWindowController, also called the constructor, you can see that there's already code in place that loads in the xib file by passing its name to the ancestor's initWithWindowNibName: method:
method MainWindowController.init: instancetype;
begin
  self := inherited initWithWindowNibName('MainWindowController');
  if assigned(self) then begin
    // Custom initialization
  end;
  result := self;
end;
public override instancetype init()
{
    this = base.initWithWindowNibName("MainWindowController");
    if (this != null)
    {
        // Custom initialization
    }
    return this;
}
init() {

    super.init(windowNibName: "MainWindowController");
    // Custom initialization
}
If you are using Oxygene or C#, you notice a pattern that is common for init* methods on the Cocoa platform: The init* method calls the ancestor, assigning its result to self/this, and then proceeds to do further initialization only if the ancestor did not return nil/null. At the very end, self/this is returned to the caller.
This is the Cocoa and Objective-C way to write initializers. Alternatively, you can also use classic Oxygene and C# "constructor" syntax to express the same:
constructor MainWindowController;
begin
  // Custom initialization
end;
public MainWindowController() : base withWindowNibName("MainWindowController")
{
    // Custom initialization
}
In Swift initializers/constructors always use the init keyword, as shown above.
Any additional initialization needed for the class can be added where indicated by the comment – although for window controllers, it is more common to do this in the windowDidLoad: method instead, as that method has full access to all the objects loaded from the .xib file.
Editing .xib files is done in Xcode, using Apple's own designer for Mac and iOS.
For this step, and for many other aspects of developing for Mac and iOS, Xcode needs to be installed on your system. Xcode is available for free on the Mac App Store, and downloading and running it once is enough for Fire to find it, but we cover this in more detail here in the Setup section.
When you select the .xib file, the main view will populate with information about the .xib, including its name, build action ("Xib"), and a helpful "Edit in Xcode" button:
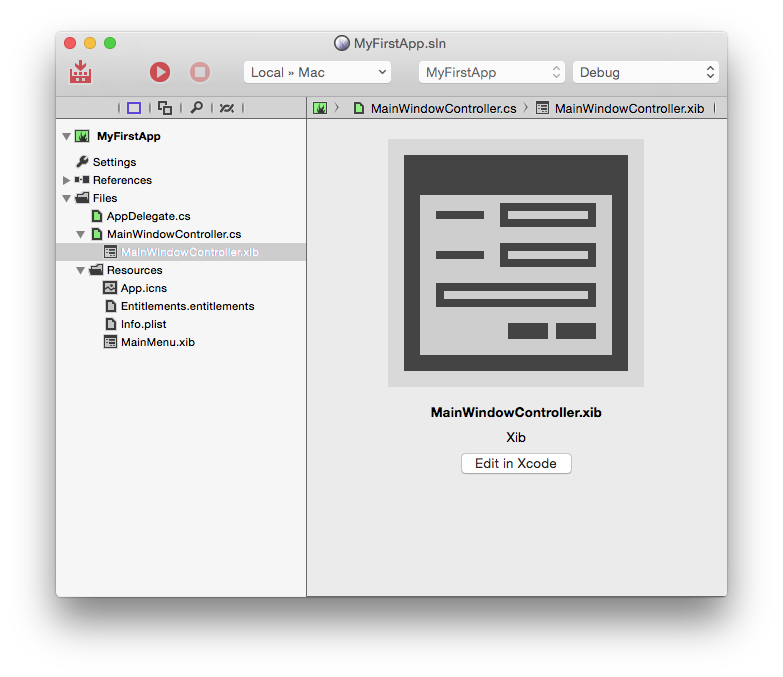
Clicking this button will generate/update a small stub project that will open in Xcode and give you access to all the resources in your project. Instead of using the button, you can also either right-click a resource file and select "Edit in Xcode" from the menu, or right-click the project node and choose "Edit User Interface Files Xcode".
Xcode will come up, and look something like this:
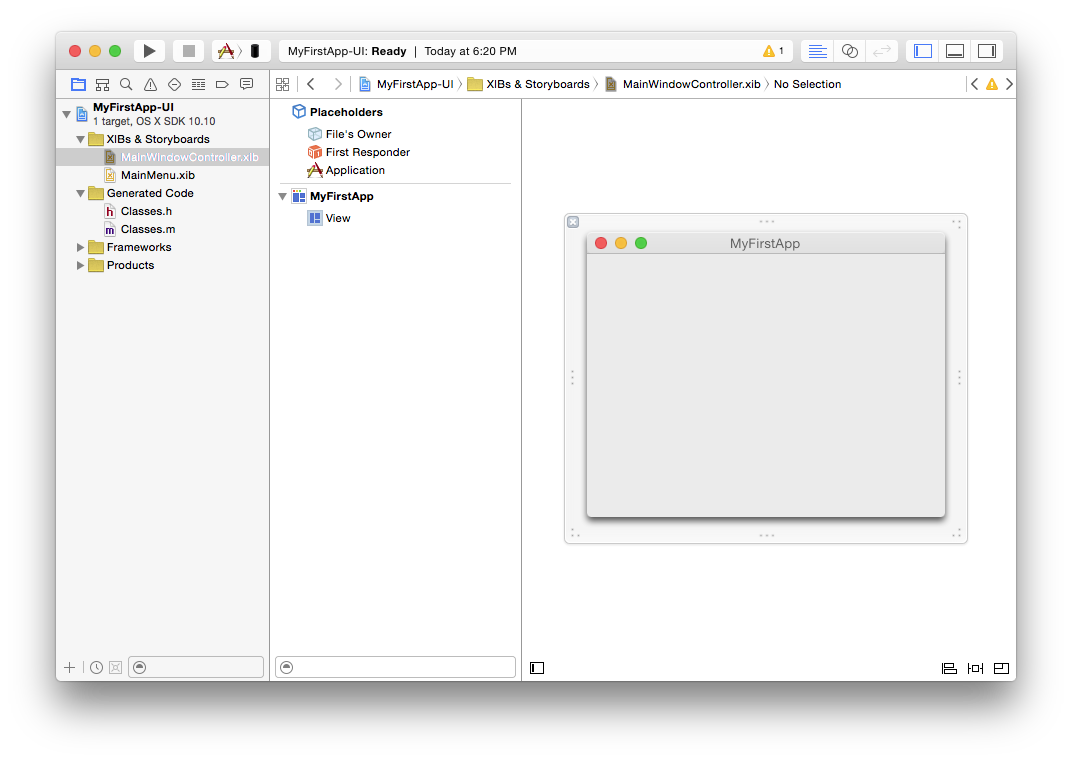
On the left, you see all your resource files represented – there's the MainViewController and MainMenu .xib files. Selecting an item will open it on the right, as is happening with the MainViewCortroller.xib in the screenshot above. To make more room, let's hide the file list (⌘0 just like in Fire), and press ⌥⌘1 to show the Utility pane on the right instead:
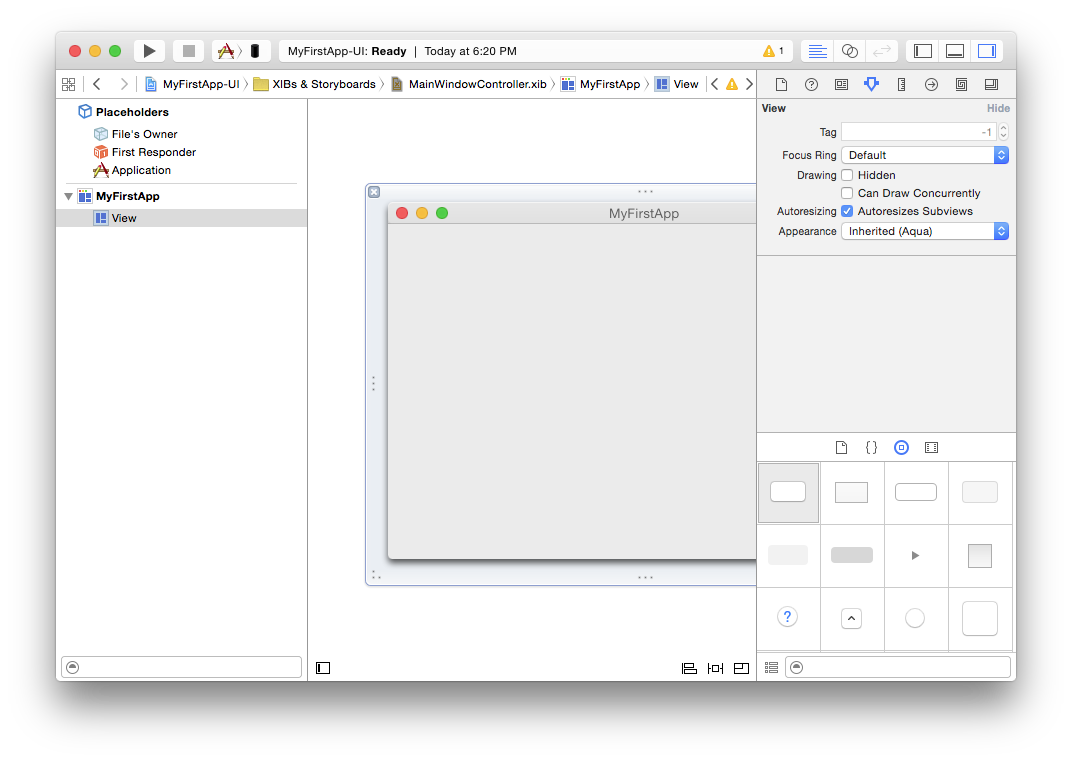
On the left, you see a tree view showing all items contained in the .xib file (currently, the Window tiled "MyFirstApp" and, nested below it, the window's main View). There are also a few "special" items listed at the top, including the "File's Owner" that we'll get back to in a short while.
In the center, you see the window designer itself, currently looking empty.
On the right, finally, the Utility pane shows properties and information about the currently selected item, divided across 8 tabs (at the top), and the palette of available components at the bottom.
The .xib file represents a hierarchy of objects that will be loaded into memory when the .xib is loaded. The window will result in an actual NSWindow class being created, the view in an NSView, and so on. "File's Owner" is special, in that it is not a class that's created from the .xib; it represents the class that loaded the .xib. In our case, that's the MainWindowController class. And indeed, if you select "File's Owner" in the tree, and then select the third tab in the Utility View (⌥⌘3), you will see that its "Class" property is set to "MainWindowController":
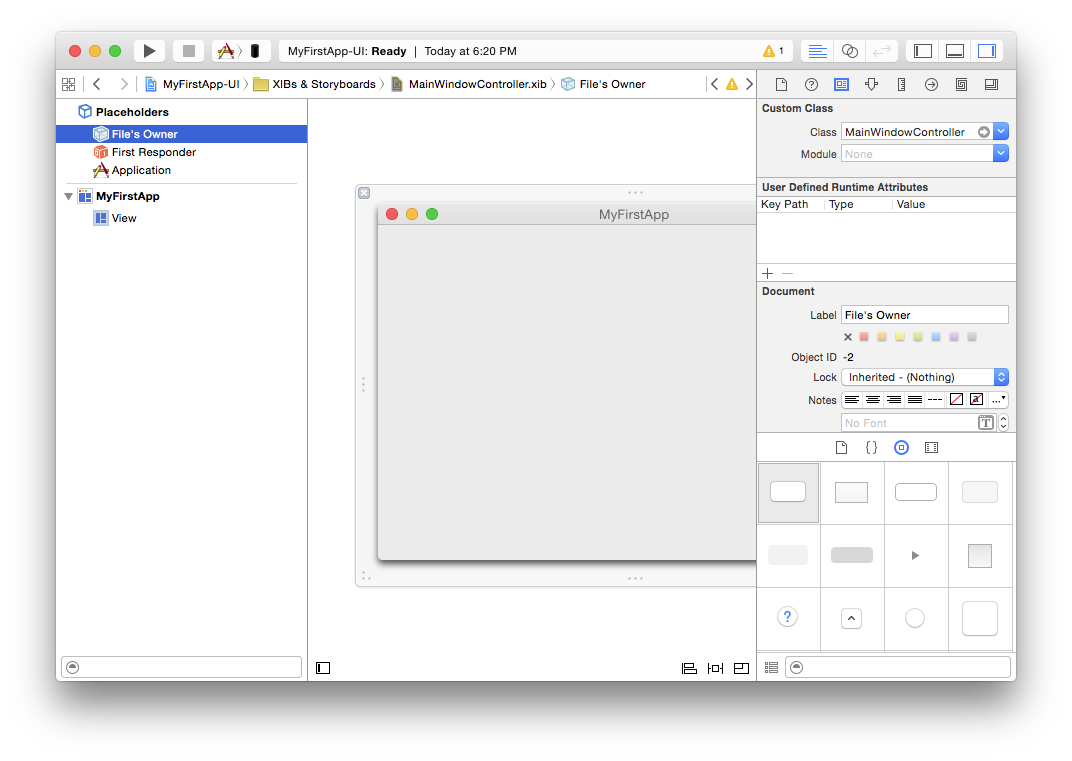
The presence of "File's Owner" here is what will allow you to make connections between objects added to the .xib, and properties and methods defined in your code.
So let's go back to Fire and start adding some (very simple) functionality to this window controller. You can close Xcode, or leave it open and just switch back to Fire via ⌘Tab – it doesn't matter.
Back in Fire, select the MainWindowController source file and let's start adding some code. We're going to create a really simple app for now, just an edit box, a button and a label. The app will ask the user to enter their name, and then update the label with a greeting message.
Let's start by adding two properties so that we can refer to the edit box and the label:
public
  [IBOutlet] property edit: NSTextField;
  [IBOutlet] property label: NSTextField;
[IBOutlet] public NSTextField edit { get; set; }
[IBOutlet] public NSTextField label { get; set; }
@IBOutlet var edit: NSTextField!
@IBOutlet var label: NSTextField!
Note the IBOutlet attribute attached to the property. This (alongside the IBObject attribute that's already on the MainWindowController class itself) lets Fire and Xcode know that the property should be made available for connections in the UI designer (IB is short for Interface Builder, the former name of Xcode's UI designer).
Next, let's add a method that can be called back when the user presses the button:
[IBAction]
method MainWindowController.sayHello(sender: id);
begin
  label.stringValue := "hello, "+edit.stringValue;
end;
[IBAction]
public void sayHello(id sender)
{
    label.stringValue = "hello, "+edit.stringValue;
}
@IBAction func sayHello(_ sender: Any?) {
    label.stringValue = "hello, "+edit.stringValue
}
Similar to the attribute above, here the IBAction attribute is used to mark that the method should be available in the designer.
Note: If you are using Oxygene as a language, methods need to be declared in the interface section and implemented in the implementation section. You can just add the header to the interface and press ^C and Fire will automatically add the second counterpart for you, without you having to type the method header declaration twice.
Now all that's left is to design the user interface and hook it up to the code you just wrote. To do that, right-click the Main.storyboard and choose "Edit in Xcode" again. This will bring Xcode back to the front, and make sure the UI designer knows about the latest change you made to the code. (Tip: you can also just press ⌘S at any time to sync.)
Drag a couple of labels, a button and an edit field from the bottom-right class palette onto the Window and align them so that they look something like this:
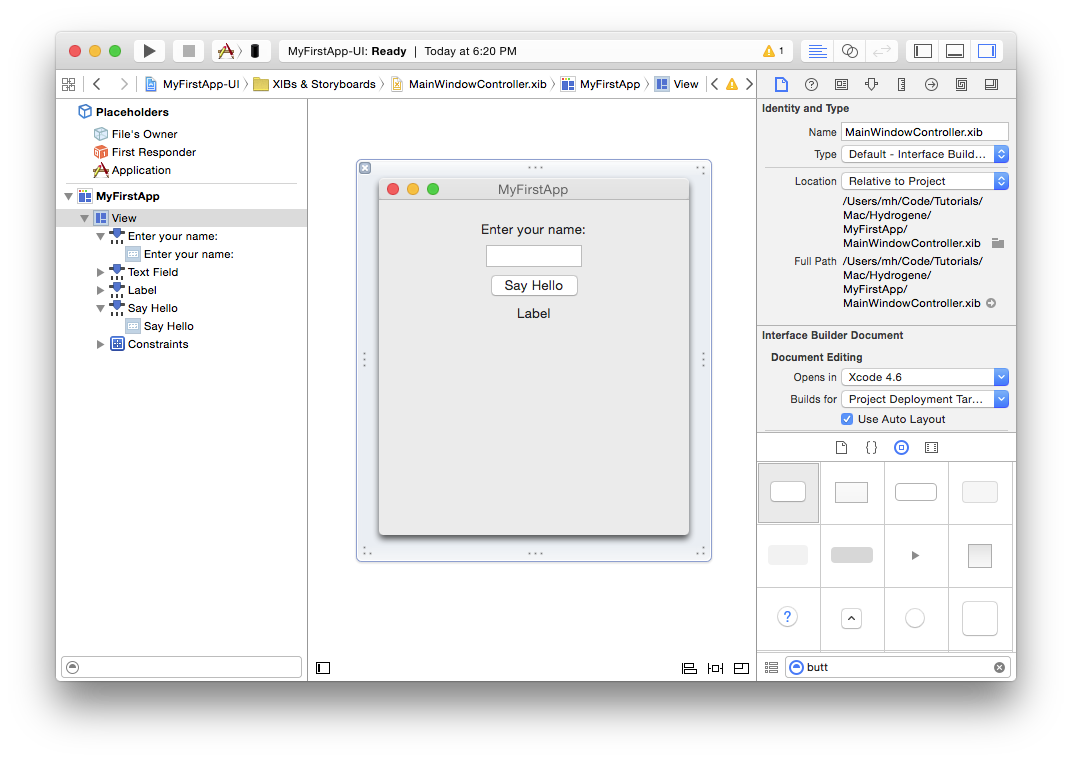
Then select all four controls via ⌘-Clicking on each one in turn, press the first button in the bottom right, check "Horizontally Center in Container" and click "Add 4 Constraints". This configures Auto Layout, so that the controls will automatically be centered in the view, regardless of screen size. In a real app, you would want to set more constraints to fully control the layout – such as the spacing between the controls, and possibly to adjust the layout for different window sizes. But for this simple app, just centering them will do:
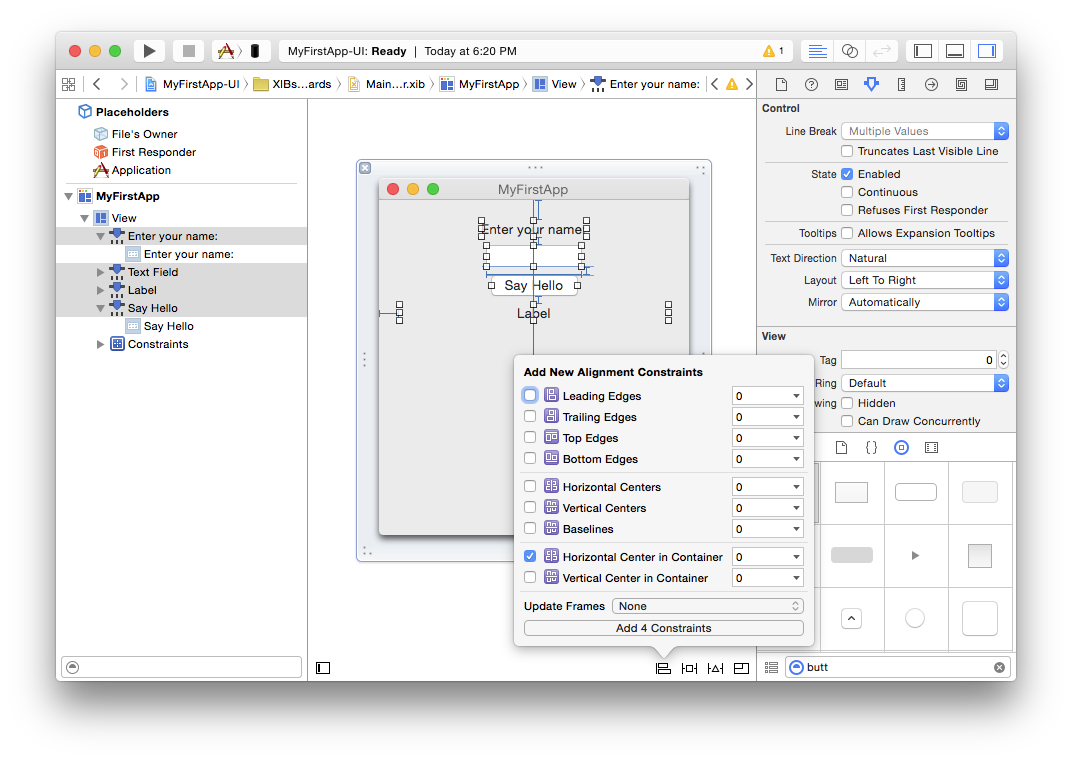
Finally, it's time to connect the controls to your code. There are three connections to be made in total – from the two properties to the NSTextFields, and from the NSButton back to the action.
For the first two, click on the "File's Owner" (which, remember, represents your MainWindowController class) while holding down the Control (^) key, and drag them onto the text field, as shown below:
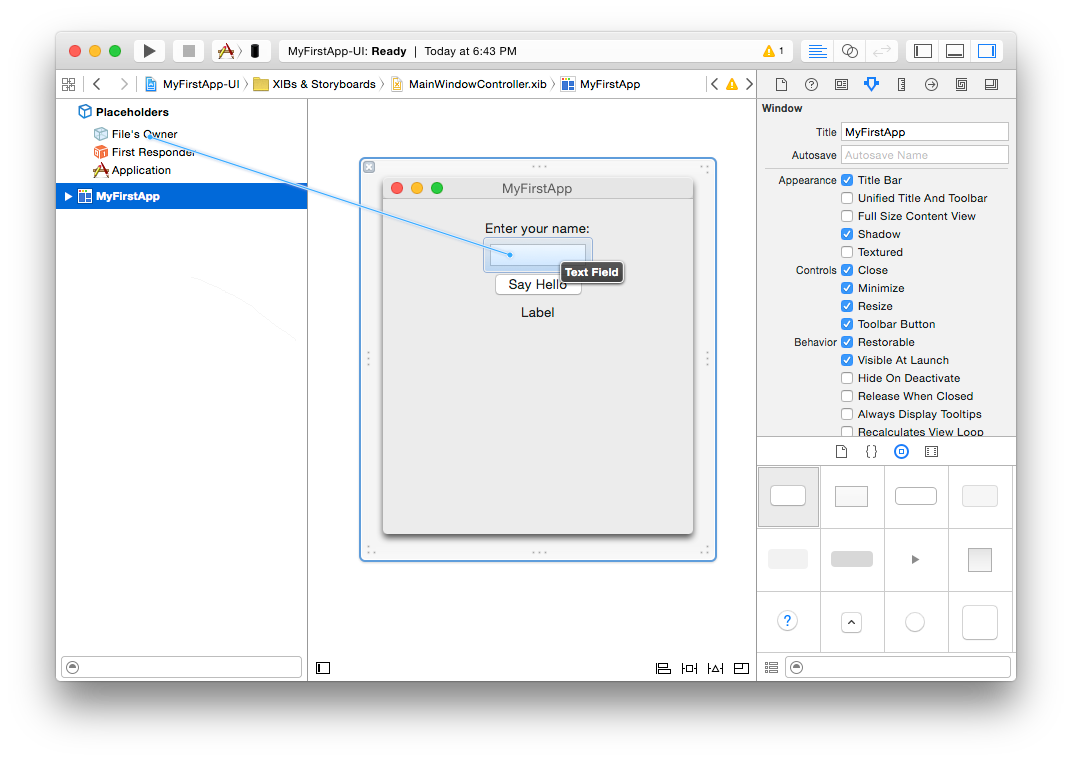
When you let go, a small popup appears, listing all properties that match up for connecting. In this case, it will be the edit and label properties we defined earlier (since both are of type NSTextField).
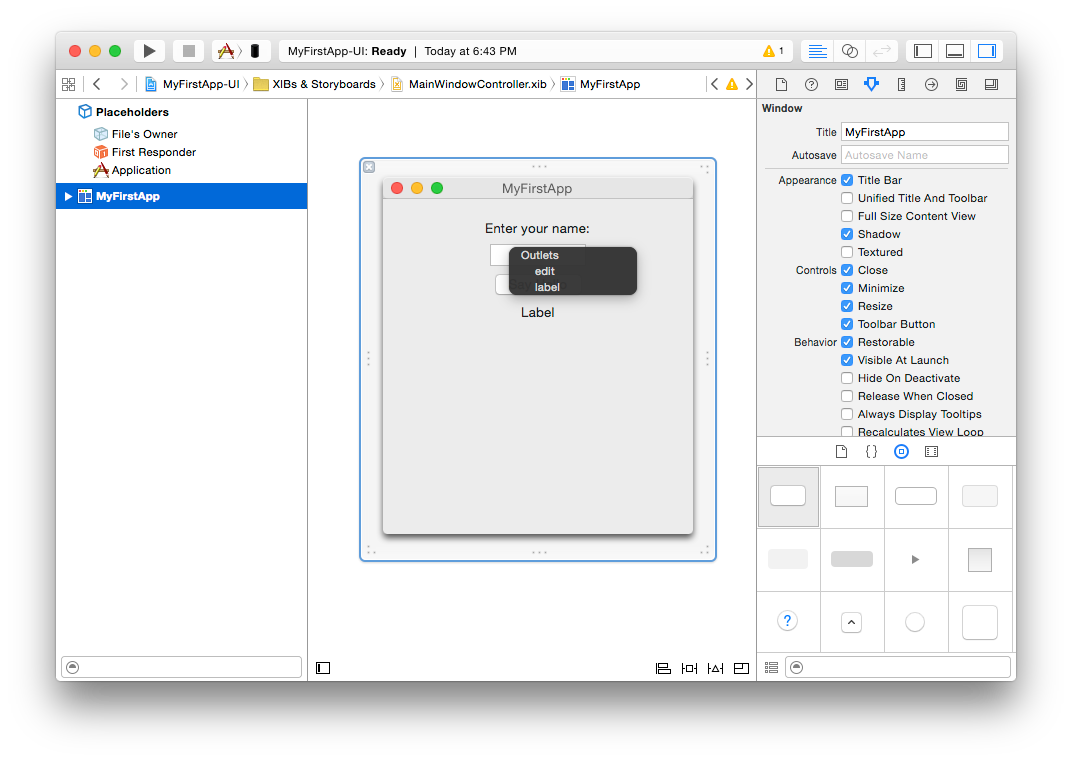
Click on "edit" to make the connection, then repeat the same step again, but this time dragging to the label, and connect that by clicking "label".
Connecting the action works the same way, just in reverse. This time, Control-drag from the button back to "File's Owner". Select "sayHello:" from the popup, and you're done.
And with that, the app is done. You can now close Xcode, go back to Fire, and run it.
Running Your App
You're now ready to run your app. To do so, simply hit the "Play" button in the toolbar, or press ⌘R.
Fire will now build your project and launch it. You will notice that while the project is compiling, the Jump Bar turns blue and shows the progress of what is happening in the top right of the window. The application icon will also turn blue for the duration; this allows you to switch away from Fire while building a more complex/slow project, and still keep an eye on the progress via the Dock.
If there were any errors building the project, the Jump Bar and application icon will turn Red, and you can press ⌥⌘M or use the Jump Bar to go to the first error message. But hopefully your first iOS project will build ok, and a few seconds later, the App should start up.
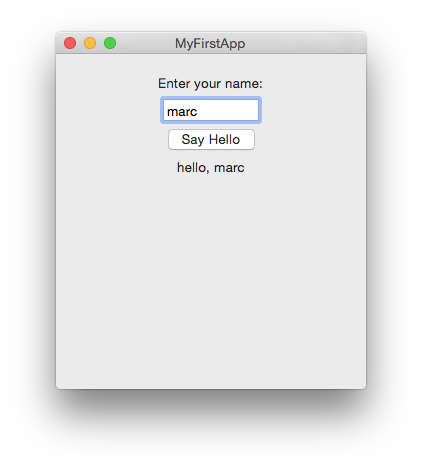
Type in your name, press the "Say Hello" button, and behold the application performing its task:
