WinForms and WPF for Delphi Developers
If you are familiar with UI development in Delphi using the VCL or FireMonkey, then making the switch to WinForms or WPF will feel natural to you, as both UI systems behave – with minor differences we will look at in this topic – very similar to the Delphi VCL.
In fact, one could argue that WinForms, created by Delphi inventor Anders Hejlsberg, is a logical evolution of the VCL. And FireMonkey is basically Embarcadero's attempt to replicate the more modern WPF system back to Delphi.
WinForms and WPF
WinForms and WPF are two different ways for creating Windows UI applications using the .NET platform. They are interchangeable, and it will be largely a matter of taste and preference which option you pick.
WinForms is a bit older, having been introduced with the original .NET 1.0 in the early 2000s. It is still well supported and widely used, although many people consider it deprecated and replaced by WPF.
WPF is a more modern take at UI design that provides many benefits over WinForms, including performance (WinForms uses GDI+, which does not use graphic acceleration, while WPF is built on top of DirectX), more flexibility in UI design, and cleaner separation between code and UI.
WPF uses XAML, a technology shared with Xamarin/MAUI and the deprecated WinRT and Silverlight platyforms – so if you are planning to also develop "modern" WinRT apps or web apps with Silverlight, WPF is a more natural choice than WinForms.
Oxygene fully supports both WinForms and WPF.
WinForms and WPF from a Delphi Developer's Perspective
Before we dive into how WinForms and WPF work in detail, let's look at Delphi's VCL for comparison.
In Delphi, you develop user interfaces by opening a window (usually referred to as a Form in VCL parlance) in a visual designer. The window will be a descendant class that you create off of the VCL TForm class, and it will be represented by two files: a source file that contains your code and the class definition, and a .dfm file that contains a binary or text representation of the window's design, with information on the different control's positions and attributes.
When you drop components onto the form, an entry gets added for them in the .dfm file, and a field gets added to your form class in a special published visibility section. At runtime, these properties get hooked up magically, as the form data gets loaded from the .dfm. Any property values you configure on controls (or on the form itself) get stored in the .dfm as well, and loaded from it on startup. Finally, you can create event handlers by double-clicking controls, or by picking more explicit event types from Delphi's Object Inspector, and when you do, stub methods get generated in your form class, ready for you to fill, along with an entry in the .dfm that connects the method to the control's event.
You are probably familiar with all of this in depth already, but it's worth spelling out the details for comparison.
Both WinForms and WPF behave pretty similarly concerning the design experience. You get a visual design surface where you can drop components and configure them. And you can double-click to connect events, and will get stub methods created for you.
Under the hood, however, things work a bit differently in both UI frameworks, and it's important to understand and be aware of those differences.
Just like the VCL, WinForms and WPF represent your form by creating a subclass of a base form class – System.Windows.Forms.Form for WinForms, and System.Windows.Window for WPF. In this class, you add your own code to implement the form's logic and to react to events.
Similar to the .dfm file in Delphi, WinForms and WPF also use a secondary file to store the core form contents and design.
WinForms
In WinForms, all design information is stored in code that gets parsed when the form is loaded into the designer, and updated/adjusted as you make changes. If your main form class is in MyForm.pas, you will see a second MyForm.Designer.pas file in your project, which Visual Studio will nest underneath it.
These two files form a single class, using an Oxygene language feature called Partial Classes, and the idea is that you write your own code in the main file, while the designer updates the .Designer.pas file as needed. Of course you can also update the designer file if you want, but you need to be careful which changes you make, as to not break the designer.
Inside the .Designer.pas file you will find a declaration for your class (marked with the partial keyword to indicate that it is merely half of a partial class). The class will have fields for any components you have dropped, and a method called InitializeComponent that the designer fills with actual code that instantiates the controls and populates all the properties you have set. When you make change to the designer, you can actually see the code in InitializeComponent change to reflect the new values.
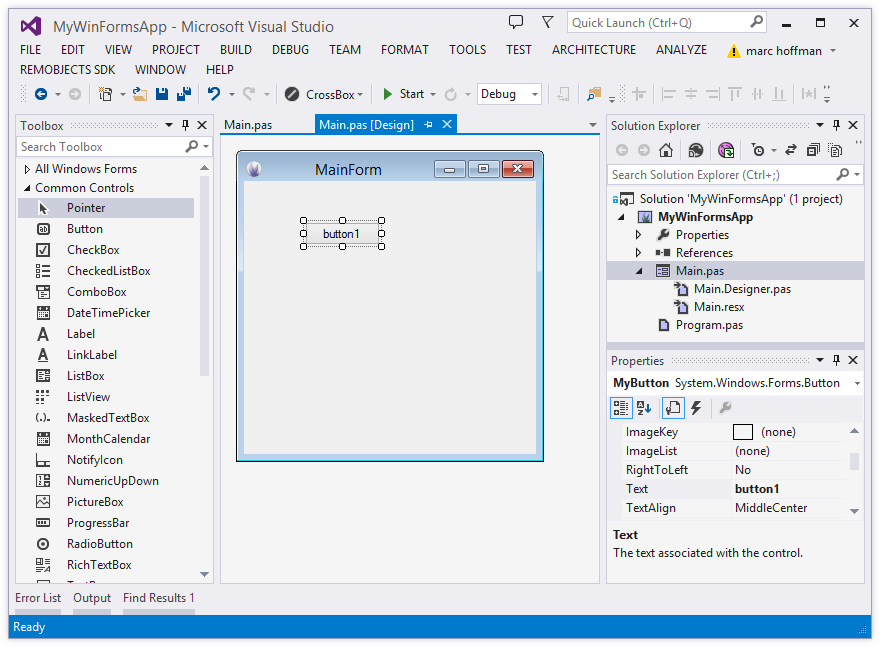
When you create event handlers (by double-clicking a control or using the Event tab in the Properties Pane, which works analogous to the event view in Delphi's Object Inspector, the designer will add the stub method to your main code file, and also add a line to InitializeComponent to hookup the event handler to the right control.
All in all this is pretty similar to how things work with the VCL – and in most cases you can just ignore that the .Designer.pas file contains actual Oxygene code, and just think of it as being comparable to the .dfm file in your Delphi app.
WPF
WPF takes a slightly different approach. Like in WinForms, you have a code file where your descendant of the base Window class is defined. But instead of a second source file, the design of your form is stored in a so-called XAML file – essentially an XML file with the .xaml extension.
XAML files are such an important part of the WPF development experience that Visual Studio actually reverses the nesting: you will see MyForm.xaml as top-level file in your project, with MyForm.pas being nested underneath it – a reversal from how WinForms files are shown.
As you make changes to your form in the designer, you are essentially directly manipulating the XML in the .xaml file. Dropping new controls adds additional XML elements to the file; changing properties adds or updates attributes in those tags.
In addition to using the visual designer, the XAML was designed to also make it convenient and easy to directly edit the XML in the code editor. This practice is so common that the XAML designer will by default show as a split view, with the UI on top and the XAML source at the bottom. You can edit either, and the other will adjust.
Different than WinForms (or the VCL), editing your WPF form will not make any changes to your code, aside from inserting event handler stubs when you create them, of course. All other changes are constrained to the .xaml file only. This makes for a nice and clean separation between UI and code, and in fact it is common in larger teams to pass .xaml files on to the UI designers who won't touch or even use the code.

You will notice that not even fields are generated in your code for the components you drop. How then can you interact with the items on your form from code?
Simple: In practice, you can think of the .xaml file as being part of your code base, and any items that show up in the .xaml file, if they have been assigned a Name, are automatically available as properties in your form class, just as if they had been declared in code. If you have a button like this in the .xaml:
<Button x:Name="MyButton" ... />
you can simply access it directly from code as
MyButton.Text := 'Click me!';
How does this work under the hood? As you compile your project (and also inside the IDE, for purposes of code completion and IntelliSense), each .xaml file gets processed into source code, creating half of a partial class that extends your own code (very similar to WinForms). This part defines properties for all the named controls in your form.
During normal development, this is not something you often have to think about or concern yourself with, but you may sometimes see this auto-generated file referred to, for example in error messages. It will have the same name as your class, but a .g.pas extension (with g standing for "generated") and it will be located in the /obj/ folder of your project. You should never touch or modify these files, as any changes you make to them will be lost when the file is regenerated.
In Practice
So you see, in practice, working with WinForms and WPF is much like what you are already familiar with from Delphi's VCL. You implement your window in a custom class derived from a root form class provided by the system. You get a visual designer where you can drop components, adjust their properties and create the look of your form in a WYSIWYG fashion. And you can create event stubs to react to user events from the controls, the same way you would in Delphi.
Your form's data and layout is stored in a second file (.Designer.pas or .xaml) that you can treat pretty much as a black box, but can also interact with and tweak manually, if so desired.
Read More
You can find out more about WinForms and WPF at these external resources:
- WinForms on MSDN
- Windows Presentation Foundation on MSDN
On using WinRT to create "modern" Windows apps instead:
- Delphi to Oxygene: Modern Windows UI Development with WinRT UI
- developer.windows.com
Other platforms:
- Delphi to Oxygene: iOS UI Development with Cocoa Touch
- Delphi to Oxygene: Mac UI Development with Cocoa
- Delphi to Oxygene: Android UI Development