Connecting to CrossBox from Water
Connecting to your CrossBox server is easy, and only needs to be done once, after which the server will automatically be available for all your projects.
If an open solution contains one or more qualifying projects (currently, that means Cocoa and Island projects), the "CrossBox" popup button in the middle of the toolbar will automatically show you a selection of all registered CrossBox servers matching your app's platform, as well as an option to "Connect to a CrossBox Server".
Select this option to add a new connection, and you will be shown the following sheet:
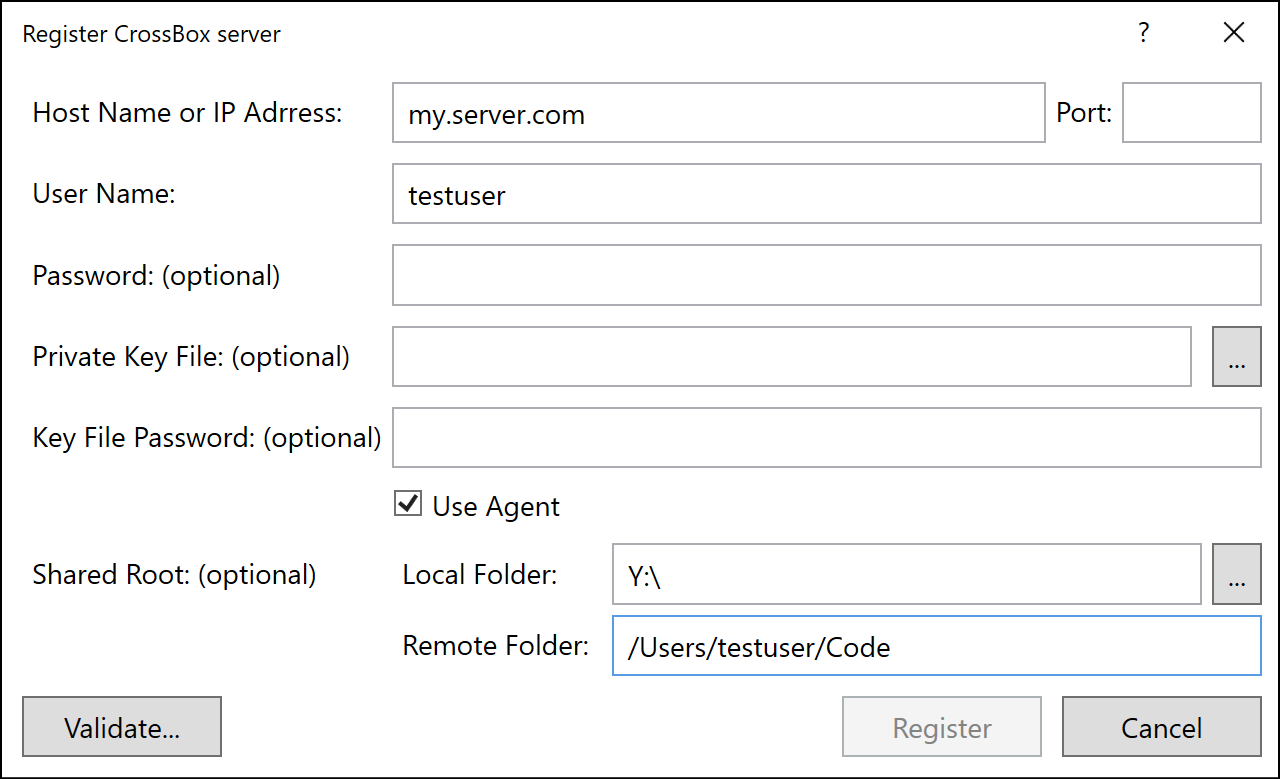
At the very least, you will need to specify the host name/address and the username for the CrossBox Server you want to connect to.
Depending on how your SSH is set up locally, Visual Studio might automatically pick up your default public key file; if it does not, you can browse for the key file manually, or simply provide a password, if your server allows password-based authentication.
The default port for SSH is 22, but you can override this with a different value if your server is listening on a different port, or you have NAT redirects in place that change the port. The machine you are trying to connect to must be reachable on this port.
(We recommend to familiarize yourself with how SSH works in general, via the link(s) provided below).
Once you provided all the information needed, you can click "Validate..." to check the connection. If all is well, after a few seconds you should see a message stating the type of the server you are connecting to, and the "Register" button becomes available.
Click "Register" and the server will be added to your list, the dialog will close, and any project in your solution that is a match for the server's platform will automatically be set to use the new server.
With that, you're now ready to press Ctrl+R and run your Island project on Linux (or Windows).
Shared Roots
You can also optionally specify a so-called "shared root folder" for your CrossBox server, if you have a folder from the server mapped as a local drive, or vice versa. This is helpful especially for Cocoa (where some build phases use the Mac, and can cause a lot of files to be transferred over SSH), but provides an extra speed boost for Island debugging, as well.
Essentially, you will provide two paths that point to the same folder, one local to your PC or VM and one that's valid on the CrossBox server.
Whenever you work with projects located within the shared root, CrossBox will forego manually transferring files back and forth via SSH. Instead, it will just build the project locally, and use the shared root to map the file paths whenever it needs to execute things remotely – both for building and for debugging.
For example, say you work in a Windows VM on a Mac. All your projects are located on your Mac, in /Users/paul/Code, and you have that folder mapped into your VM as drive Z:\. You can set the "Remote Folder" and "Local Folder" settings of your shared root respectively, and whenever you work in a project from drive Z:, CrossBox will use the shared root. (If you open a project located elsewhere, say in C:\, CrossBox will fall back to transferring files via SSH as needed.)
Another example, say you are working on a Windows PC, but have a Linux VM for testing Island projects. Your C:\Projects\ folder is mapped as /mnt/projects/ into the VM. Once again you can set the "Local Folder" and "Remote Folder" settings approriately.
Note: Before using the shared root, CrossBox will make sure the two folders do indeed match up, by creating a small temporary file.
Also note: Shared roots require the use of Elements 10 and EBuild.