Installing CrossBox
To first install CrossBox on your Mac, simply unzip CrossBox.zip on your
Mac and copy the contained CrossBox.app into your /Applications
folder. Double-click the .app to start it, and if you will be using
CrossBox a lot, we recommend to configure it to launch right when your
Mac boots up by right-clicking the CrossBox icon in the Dock and
selecting "Options|Open at Login".
You can obtain CrossBox.zip by copying the Zip file from your Windows PC or VM where you installed Elements (it will be located in C:\Program Files (x86)\RemObjects Software\Elements\Toffee or a similar folder) over to your Mac (for example via file sharing or by dragging it from the VM onto your Mac desktop,
NOTE: Make sure to unzip CrossBox.zip on the Mac. Unzipping it
on Windows and then transferring the folder can cause the file rights to
get mixed up so that the resulting .app will not launch correctly.
To run CrossBox, you will need to install Mono 3.2 or later, which is available for free download here.
Please note that the new Mono 4.8 has some known bugs that prevent CrossBox from running properly. We recommend to sticking to Mono 4.7 or earlier to use CrossBox. If you must install Mono 4.8 or later for other reasons, you can run CrossBox from the Terminal by locating CrossBox.exe inside the .app bundle and then running mono CrossBox.exe. --console.
Connecting to CrossBox
Once CrossBox is installed on your Mac, connecting to it is easy.
If your Mac and Windows PC or VM are on the same network, we recommend installing Bonjour on Windows, and Visual Studio will detect your CrossBox server(s) automatically. If you do not wish to install Bonjour, or your Mac is on a remote network, you can manually specify the server's address via the "Register Server... menu.
Once you select a discovered server or provide an address, the IDE will reach out to the server and ask for authentication. On the Mac, CrossBox will display a four-digit authentication code next to the CrossBox icon in the menu bar and also as system notification (on Mountain Lion and later).
Simply enter this code into the IDE when prompted, and the connection will be established. The IDE will have the authentication information, so you will not have to repeat this step in the future, unless you install CrossBox on a new Mac, or install Elements on a different Windows PC or VM.
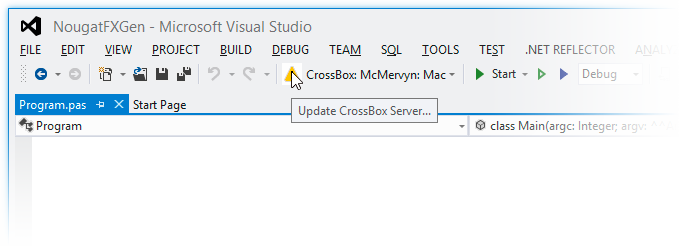
Updating CrossBox
Once CrossBox is installed and running on your Mac, you can update to newer versions right from Visual Studio. As you upgrade Elements on your Windows PC or VM, you will notice that the CrossBox icon in your Visual Studio toolbar turns into a yellow icon with an exclamation mark if the version of CrossBox on your Mac is out of date. Simply click the yellow icon and the IDE will automatically transfer the new version of CrossBox over to your Mac, update it and relaunch it.
Configuring your Mac for CrossBox
Before you can use your Mac with Oxygene for Cocoa via CrossBox, you also need to install Xcode, Apple's development environment for Objective-C, because Xcode includes a few essential command line tools that CrossBox uses under the hood for building, signing and packaging your Mac and iOS application.
See Setting up Xcode for use with Visual Studio for more details